VACES
Overview
The Virginia Appellate Courts Electronic System (VACES) is designed for users associated with a registered
Agency/Business/Law Firm/Organization to submit documents (filings) electronically for Supreme Court of Virginia (SCV) and Court of Appeals of Virginia (CAV) cases.
This manual is organized to provide an overview of the eFiling system with detailed instructions on how to use VACES and is intended to serve as a training and resource guide for VACES users.
Introduction
eFilings
Pursuant to the Supreme Court of Virginia’s June 1, 2021 order amending Parts 5 and 5A of the Rules of the Supreme Court of Virginia, the Supreme Court of Virginia requires electronic filing of all pleadings. Pro se parties may file in paper by obtaining leave of Court.
Pursuant to Part 5A of the Rules of the Supreme Court of Virginia, the Court of Appeals of Virginia requires electronic filing of all pleadings. Pro se parties may choose to file in paper. Parties represented by counsel may only file in paper by obtaining leave of Court.
Please note that a person who files a document electronically shall have the same responsibility as a person filing a document in paper form for ensuring that the document is properly filed, complete, and readable.
Registered users can submit all case filings electronically to the SCV and the CAV through the VACES. The system allows users to submit up to twenty-five documents with each submission. Document submissions exceeding 150 MB Portable Document File (PDF) size limit must be uploaded as separate volumes.
All electronically filed documents must be in PDF format and must be text searchable.
Opening Briefs, Appellees’ Briefs, Reply Briefs
Briefs must be PDF files and must meet the criteria below:
- PDF files must be text searchable.
- The brief must not be created
by using a scanner to produce the PDF file.
- All pages, except the cover page in the Filing,
must have a page number located in the center section of the page footer. The page numbering in the Table of Contents and Table of Authorities is not to be included in the page numbering sequence of the Filing and should be assigned thumbnail page numbers using Roman Numerals, e.g., i, ii, iii, iv, etc. The thumbnail page numbers in the brief must correspond with the page numbers in the p
age footer.
- The brief must contain a Table of Contents.
- The cover page, Table of Contents, Table of Authorities, and all entries therein must be bookmarked to
the appropriate page. The bookmarks must be placed in an outline format, and be bookmarked according to each heading in the Table of Contents.
- Briefs must be set to open with a Bookmarks Panel and Page layout in its initial view.
- The Page Layout should be set
to Single Page with Magnification set to Fit Width.
- The brief must open to the cover page. Set the page number of the cover page by inserting a space.
If the message, “The page number cannot be left blank” is generated, check the thumbnail page number for the cover page. The thumbnail page number for the cover page must be none, which means the cover page
thumbnail does not have a page number.
Appendices
Appendices must be PDF files and must meet the criteria below:
- Appendices must be text searchable.
- Appendices must be scanned with an Optical Character Recognition (OCR) feature.
- If a scanned image PDF must be used the paper document should typically be scanned at 300 dpi (or higher, depending on what is necessary to make the image easily readable) with the black and white setting, unless the original document contains a color image.
- If the original of an image included in the appendix is displayed naturally in a landscape format, that image must be rotated so the image in the electronic appendix can be viewed in the same plane as the other pages of the appendix.
- All pages, except the cover page in the Appendix, must have a page number located in the center section of the page footer and all pages must be properly rotated for viewing. The page numbering in the Table of Contents is not to be included in the page numbering sequence of the Appendix and should be assigned thumbnail page numbers using Roman Numerals, e.g., i, ii, iii, iv, etc. The thumbnail page numbers in the Appendix must correspond with the page numbers in the page footer.
- Appendices must contain a Table of Contents, and all entries therein should be bookmarked according to each heading in the Table of Contents.
- Appendices should open with the Bookmarks Panel and Page layout
in its initial view.
- The Page Layout should be set to Single Page with Magnification set to Fit Width.
- Appendices should open to the cover page. Set the page number of the cover page by inserting a space.
If the message, “The page number cannot be left blank” is generated, check the thumbnail page number for the cover page. The thumbnail page number for the cover page must be none, which means the cover page
thumbnail does not have a page number.
- Every reasonable attempt must be made to ensure that all pages in the Appendix are readable, including date stamps, handwritten notes, photographs, etc.
- All pages in the Appendix must be aligned properly for viewing without rotation.
All Other Pleadings (Notice of Appeal, Petition for Appeal, Brief in Opposition, Writ-level Reply Brief, all motions, correspondence, etc.)
- All electronically filed documents must be in PDF format and must be text searchable.
- All pleadings other than the briefs and appendices listed above may be filed without special formatting. Bookmarks and thumbnail page numbering are not required.
Important: See Appendices for additional information.
Support
If the user does not get a satisfactory answer to questions or problems by reviewing this document, which is also accessible through the Help link on the VACES navigation bar, the user may contact the SCV or CAV Clerk's Offices.
When VACES is unavailable, a message will display the Hours of Operation page instead of the Login page. Clicking the Return to the Web site of Virginia’s Judicial System hyperlink will route to the external link http://www.courts.state.va.us/
The system is available daily, including weekends, and holidays, from 7:00 AM to 12:00 AM (EDT/EST). If a user is still logged into the system as of 12:00 AM EDT/EST, the user will be automatically logged out of the system upon clicking any button/link/icon/etc.
eFiling Support
The system is available for eFiling submissions during the operating hours of 7:00 AM to 12:00 AM EDT/EST.
Users in the process of uploading an eFiling submission before 12:00 AM will be able to complete the submission
process up to the 2:00 AM EDT/EST system maintenance window shut off.
VACES Roles and Functions
The term User encompasses:
- Administrators;
- Administrator/Filers; and
- Filers
Administrator Only
The Firm’s Administrator can support organizational account management and can perform the following tasks:
- Manage the Organization’s contact information;
- Grant user access and permissions;
- Add or delete other users;
- Update users’ contact information; and
- Unlock and reset users’ passwords.
Important: It is strongly recommended that all Organizations, including Sole-Practitioners, designate a backup or secondary Administrator, either as an Administrator Only user or an Administrator/Filer user, for the sole purpose of supporting a primary Administrator user.
Filers
A Filer is a user who files a document electronically and shall have the same responsibility as a person
filing a document in paper form for ensuring that the document is properly filed, complete, and readable.
Filers submitting eFilings can use the system to perform the following
functions:
- Submit eFilings for all case filings with SCV and CAV;
- Receive event notifications by email; and
- View the user’s eFiling submissions history up to 30 days.
Filers submitting Digital Oath Card can use the system to perform the following functions:
- Submit Digital Oath Card to SCV Clerk's office;
- Receive event notifications by email; and
- View the user's Digital Oath Card submissions history up to 30 days.
Administrator/Filer
An Administrator/Filer user can support both the organizational account management as an Administrator and the electronic document filings as a Filer as described in the previous two sections.
The sole additional feature given to the Administrator/Filer is that the user can view all of the Organization’s eFiling submissions up to 30 days instead of only the eFiling submissions filed by the individual.
Software
Administrators must ensure that users' equipment and software meet requirements for connecting to the VACES and that the organization has the minimum system and software requirements to use and operate the system.
In order to use the VACES, the user’s equipment must meet or exceed the following software and hardware requirements and use a computer operating with internet access and an Internet browser software such as:
- Google Chrome (version 43 or higher)
- Microsoft Edge (latest version)
- Mozilla Firefox (version 39 or higher)
- Microsoft Internet Explorer (version 11 or higher)
- Apple Safari (latest version)
- Compatibility View for Internet Explorer should not be turned on;
- Adobe Reader® or equivalent software to view Portable Document Format (PDF) documents (PDF reader software is free and downloadable from various websites);
- The correct security settings, on the computer, that allow it to accept cookies from the VACES.
In addition to the requirements above, users should not use a scanner unless absolutely necessary. There
are several PDF writer/conversion programs available on the Internet, as well as existing functionality within many newer word processing programs.
Registration
Overview
Organizations, Firms, or a Pro Se (self-representing) Party or Oath Card Submitters must be registered with the Virginia Appellate Courts Electronic System (VACES) to use the system. The Organization’s initial administrator, or the person who registers the organization with VACES, must first request a VACES account and all registrants must have a User Profile.
Navigate to the VACES website and continue the process by using the Account Request instructions below.
Account Request
An organization’s initial administrator or a Pro Se user or Oath Card Submitter must first submit an Account Request in order to complete VACES Registration and use the system.
Requesting an Account
- Request a VACES account by navigating to the VACES website and select the eFiling Registration Application.
Note: The system will navigate to the Account Request screen. All fields with a red asterisk require entry.
- Enter a valid email address and confirm the email address entry.
- Click Register.
A confirmation screen will display indicating an email notification has been sent to the email address provided to continue the registration process.
Email Verification
- You will receive an automated email response from the system to verify your email address. Look for an email with “Virginia Appellate Courts eFiling System: Email Verification” in the Subject line.
- Click the link (or copy and paste into your browser) from the Email Verification email and follow the on-screen instructions to continue registration.
Note: The Email Verification link is time sensitive
and must be accessed before the noted time expiration.
Account Registration
After you click and open the hyperlink in the email you received, the VACES Account Registration page will appear and indicate that your email has been verified.
- In Registrant Type, select Attorney or Firms or Pro Se Litigants or Oath Card Submitters.
Note: Persons representing themselves with no attorney or firm are self-representing parties or
Pro Se Litigants. See VACES Roles and Functions for more information about user roles and functions.
Note: Oath
Card Submitters are new Attorneys registering solely for submitting oath card to the Supreme Court of Virginia Clerk's office. See VACES Roles and Functions for more information about user roles and functions.
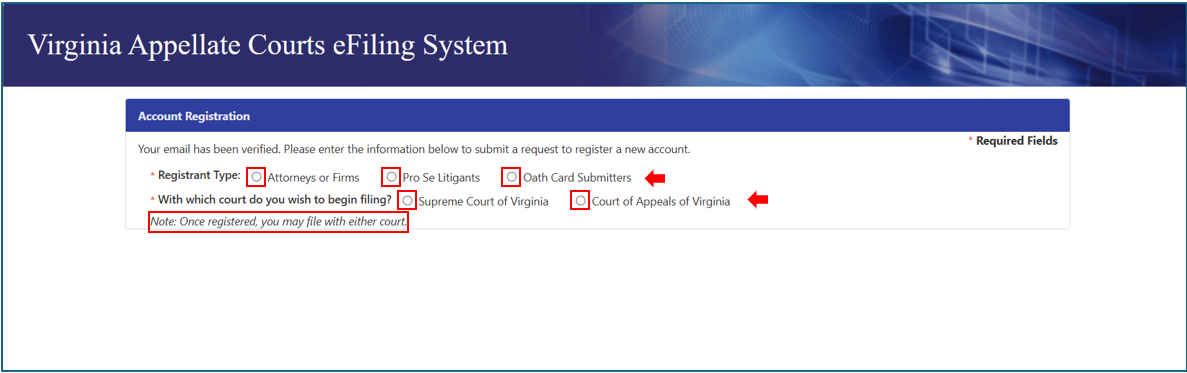
- Select the court you wish to begin filing with, Supreme Court of Virginia or Court of Appeals of Virginia,
to proceed.
Note:
- Once registered, you may file with either court.
- Oath Card Submitters will be defaulted to the Supreme Court of Virginia.
Attorneys or Firms
Attorneys or Firms may select Administrator/Filer or Administrator Only.
- Enter the Agency/Business/Law Firm name, the address, and other required information in the fields provided.
- Create and enter a PIN (Personal Identification Number or word) and retain your PIN to re-enter later to validate your identity when completing your VACES registration.
Important: This PIN will never be provided by this system and is specifically used to validate your identity when later completing your registration.
- Check the box next to Same as agency/business/law firm address, if applicable.
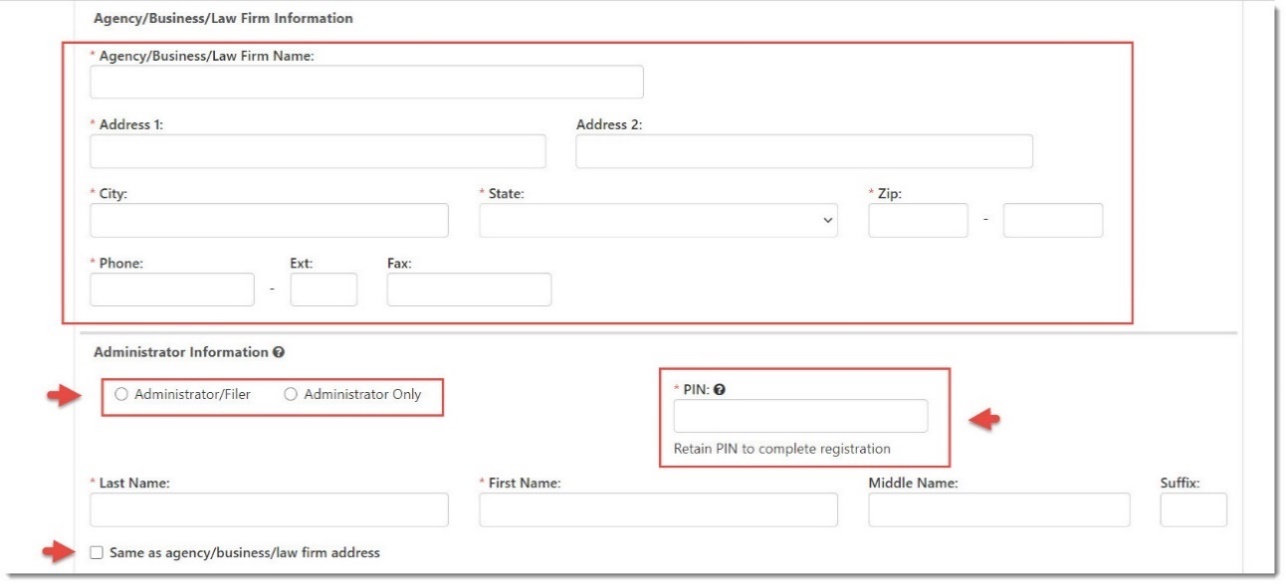
- Scroll down to complete all of the remaining required information.
- After all required information is entered, scroll to the bottom of the page and click Submit Registration to continue.

Pro Se Litigants or Self-Representing Parties
Persons representing themselves, with no attorney or firm, are self-representing parties or Pro Se Litigants.
- Enter your name, address, and other required information in the fields provided.
- Create and enter a PIN (Personal Identification Number or word) and retain this PIN to re-enter later to validate your identity when completing your registration to this system.
Note: This PIN will never be provided by this system and is specifically used to validate your identity later when completing your registration.
- Scroll down to complete the remaining information.
- After all required information is entered, scroll to the bottom of the page and click Submit Registration to continue.

Oath Card Submitters
New Attorneys submitting digital oath card to SCV Clerk's Office or Oath Card Submitters.
- Enter your Bar# in the field provided and click on the Retrieve button.
- Create and enter a PIN (Personal Identification Number or word) and retain this PIN to re-enter later to validate your identity when completing your registration to this system.
Note: This PIN will never be provided by this system and is specifically used to validate your identity later when completing your registration.
- After all required information is entered, scroll to the bottom of the page and click Submit Registration to continue.
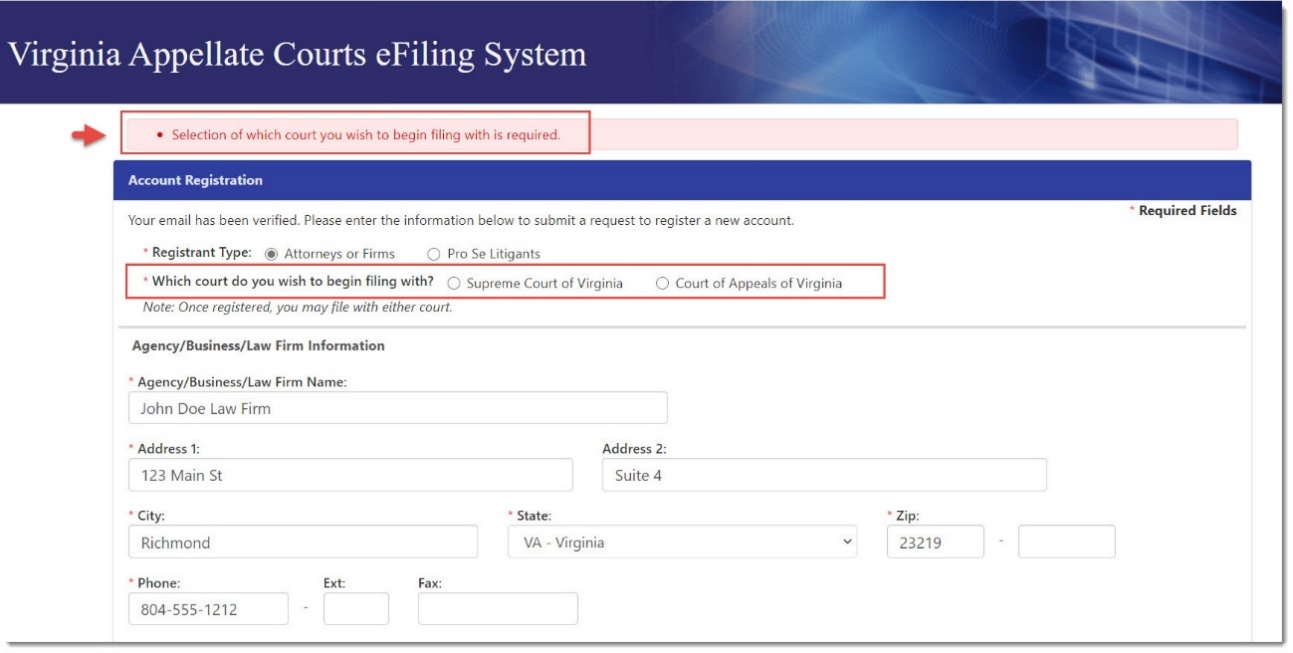
Resolving Registration Submission Errors
There may be required fields that still need to be entered; if so, a message will appear at the top of the page to alert you to fill in the missed fields. For example, in the capture below, the court still needs to be selected.
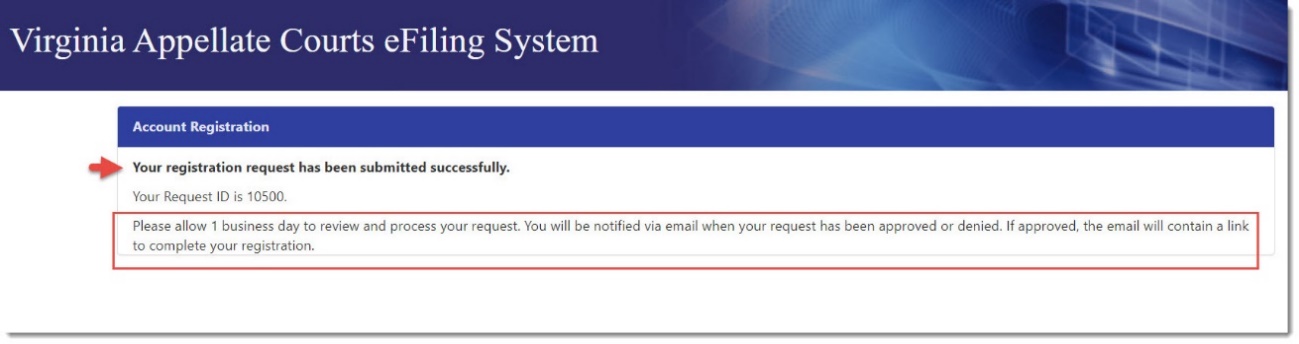
Successful Registration Submission
Complete any missed fields and submit the registration. A message will appear to inform you that the registration has been submitted successfully.
Note: An Account Registration submission does not grant access to the system; you will receive an email notification upon approval or rejection of your registration submission within the time period noted.
Complete Registration
If your registration request is approved, you will receive a confirmation of registration email to continue. Read the email instructions to complete your registration and be aware that the confirmation of registration link will expire (as detailed in the email).
- Click the link in the email (or copy and paste it in your browser). The Complete Registration page will appear.
- Create a unique VACES User Name and Password and enter
them into the boxes, using the parameters listed.
- Enter your PIN (Personal Identification Number or word) that was created during your registration submission.
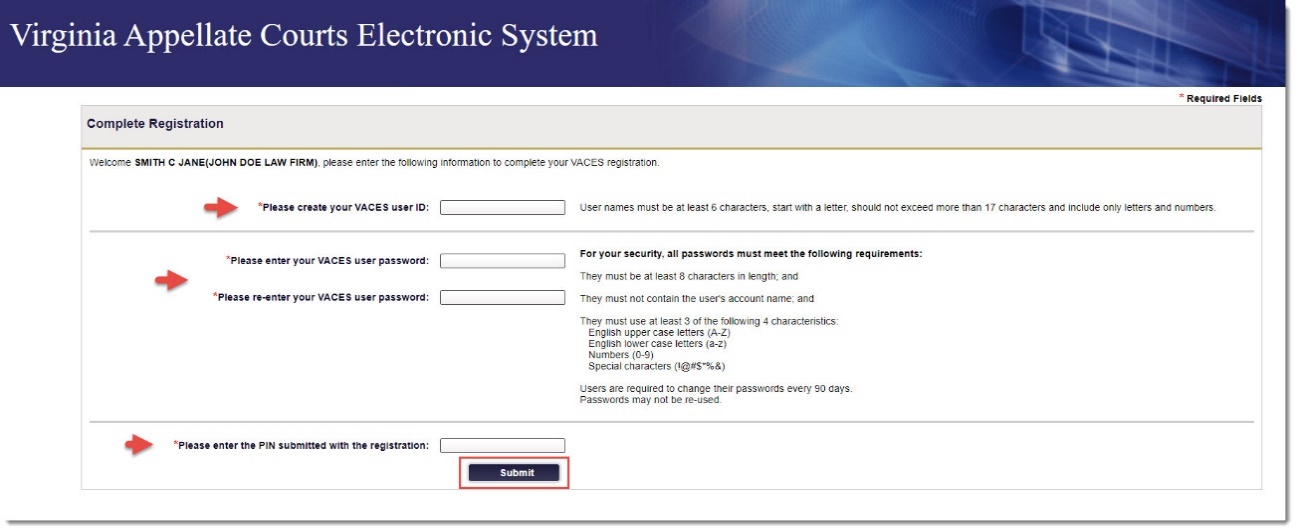
- When all the required information is entered as required, click Submit.
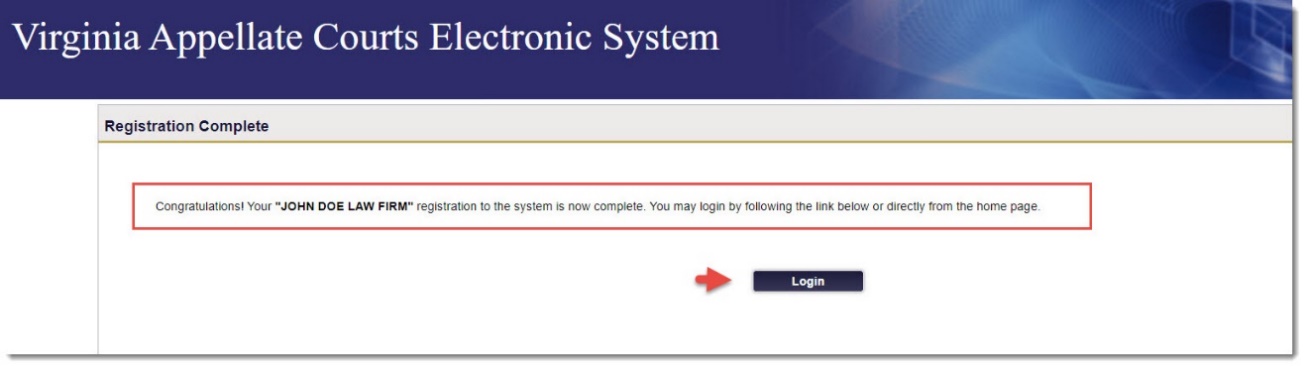
- A message will display to indicate your Registration is Complete; click Login to log into the VACES system and continue.
Note: You may reach the Court Administrator for the Supreme Court of Virginia
at: [email protected] and for the Court of Appeals of Virginia at: (804) 786-5651.
First Time Users
The following users will not be required to change/update their password:
- Users with an existing Virginia Judiciary Electronic Systems account (VJCS, VACES, GALR, etc.) because
their password is applicable for all systems; and
- The initial Administrator on the VACES Registration Application
- Oath Card Submitter
Initial Login
Upon logging into the system for the first time, users will be required to perform the following tasks:
- Create a password.
Note: The password provided is temporary and will expire immediately upon the initial login.
- Choose and answer three security questions; and read and accept the VACES Terms and Conditions of Use.
Important: Be sure to follow all instructions.
To log into the system for the first time:
- Open a web browser and navigate to the Login page https://eapps.courts.state.va.us/usermgmt/initialLogin.action?appContext=DRS and the VACES login window will display.
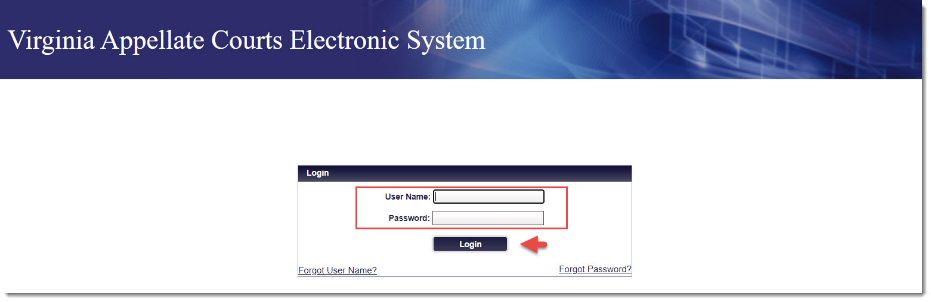
- Enter the Login credentials provided by the Administrator.
- Enter the User Name and enter the temporary password.
- Click Login. The system will route to the Password Reset screen. Users will see a password expiration message instructing the user to set a new password.
- Create and enter a new password in the New Password field.
Note: Safeguard your password, only an Administrator can reset your password.
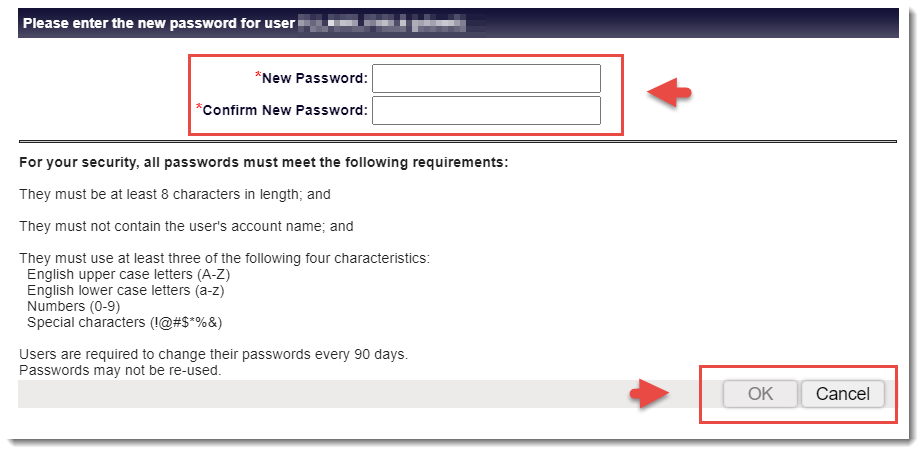
-
Re-enter the password in the Confirm New Password field and click OK.
Note: If the passwords do not match or do not meet the minimum password requirements, an error message will appear. See Settings/User Profile
to review the Password section for more information.
-
Click Login. A message will display indicating the password reset was successful and then the
system will route users to the Provide Security Questions and Answers screen.
-
Enter the Login credentials with your User Name and Password.
-
Click Login to continue.
Set Security Questions and Answers
Users will be prompted to select and answer three security questions on the Security Answers page during
the initial login process.
- To set the Login security questions and answers, choose three different security questions using the
drop-down lists.
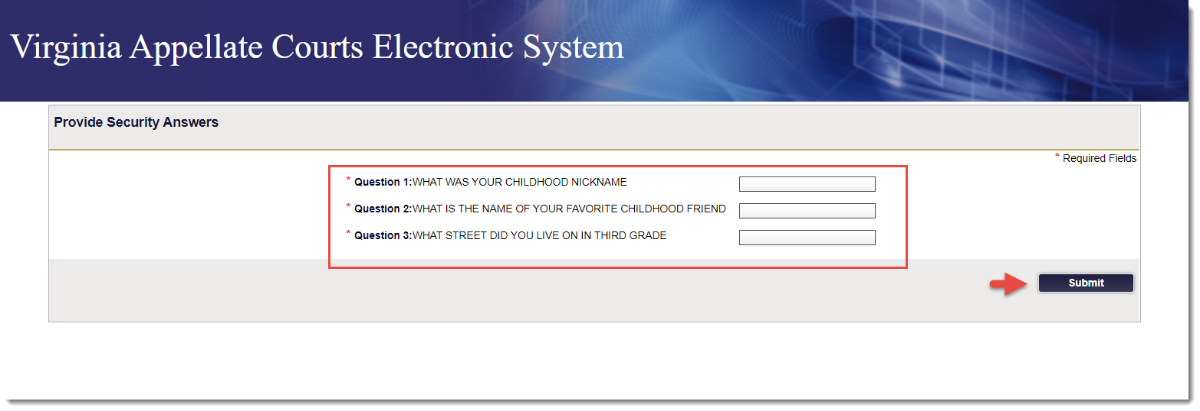
- Provide unique answers for each security question selected.
- Click Submit. The system will route to the Terms & Conditions screen.
Accept Terms and Conditions of Use
Users are encouraged to carefully read and accept the Terms and Conditions of Use (Terms) on the Terms & Conditions page.
By accepting these Terms, this demonstrates that the user wishes to proceed with the VACES registration. The system will then route to the Home page.
Users who select Decline will be routed to the Login page and will not be permitted to access the system
until they accept the Terms. As the Terms are updated, users will be asked to agree again in order to retain access to the VACES.
System Navigation
Overview
The user’s Home page view will depend on the role assigned by an Administrator.
To access the VACES system, use the following instructions.
- Open a web browser and navigate to the Login page https://eapps.courts.state.va.us/usermgmt/initialLogin.action?appContext=DRS.
Note: The VACES login window will display.
- To Log in, enter the User name and enter the Password.
- Click Login. Once the user has logged into the VACES successfully, the Home page will display.
Note: If the user has access to multiple Virginia Judiciary Electronic Systems (VJCS, VACES, GALR, etc.)
the Login page will navigate to the System Selection page. Select the Virginia Appellate Courts Electronic Systems (VACES) option to continue.
Navigation Bar
The navigation bar is visible once the user successfully logs into the system. Users have the ability to move between the system’s screens below:
- Home
- New Filing (visible for user designated as Filers)
- Oath Card Submission (visible for users designated as Oath Card Submitters)
- Account Management (visible for users designated as Administrators)
- Settings
- Help
- Logout

Home
The Home page will display once users log into the system successfully. Depending on the user’s role, the Home page displays as one of the screen options below:
- Filers (users with filing privileges) will see two sections as their Home page. The Filings Pending Payment section
and the Submission History section.
Note: Users designated as Administrator Only will see the Account Details screen as their Home page.
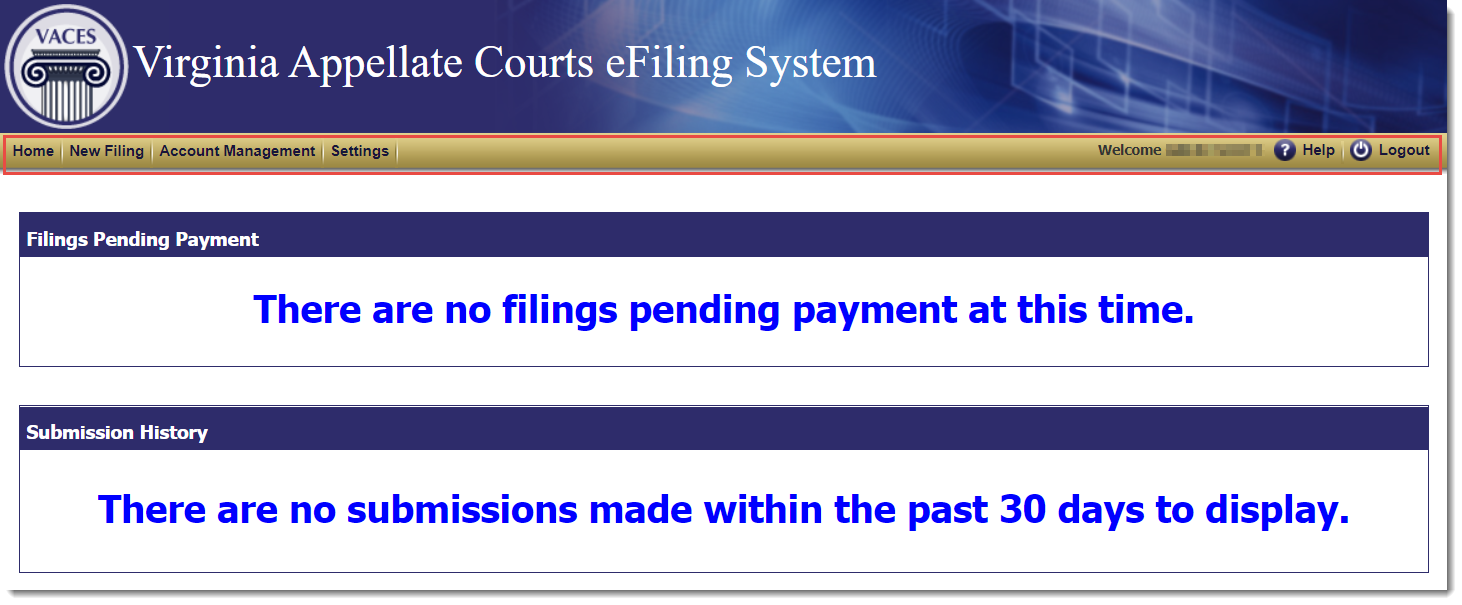
-
Once a filing has been submitted, the user will see filings listed in the Filings Pending Payment section on their Home page.
- The Pay Now
 icon is on the right side of each listing in the Actions section. See Payment Processing for more information.
-
Similarly, once a submission has been made, the user will see the submissions listed in the Submission History section on their Home page.
- The Expand Details
 icon is on the right side of each listing in the Actions section and used to review submissions in more detail. See eFiling Submissions for more information.
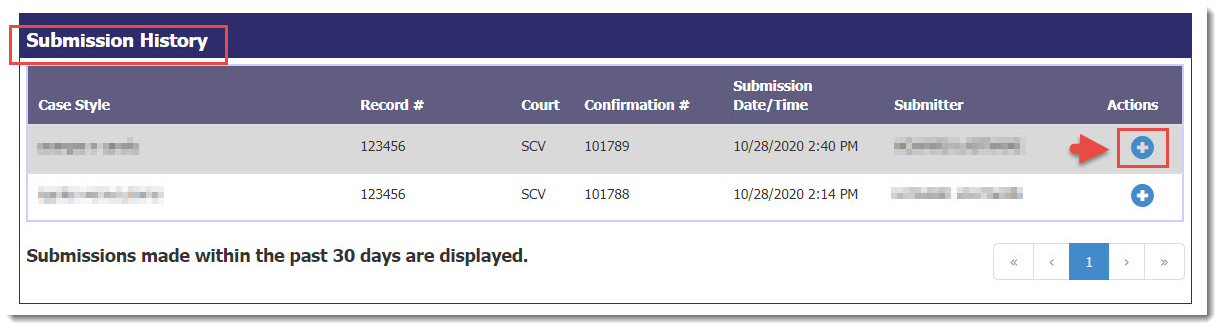
-
Users with filing privileges for eFilings or oath card submission will be able to see the Submission History made by the user within the past 30
days.
- Administrators with filing privileges will see all submissions made by the Firm’s users. See VACES Roles and Functions for further details.
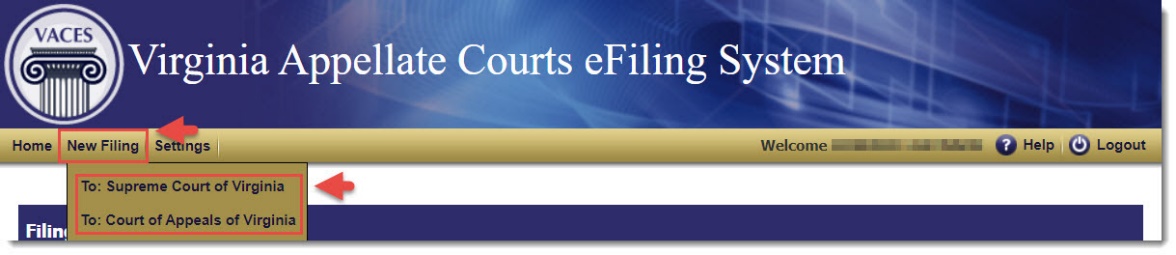
New Filing
Users with filing privileges may submit a filing by using New Filing in the Navigation bar and selecting the desired court in the drop-down.

See eFiling Submissions or Oath Card Submissions for more
information.
Account Management
Only users designated as Administrator have the ability to view the Account Management link on the navigation bar. This link leads to the Account Details page that has two sections, Account Information and User Information.
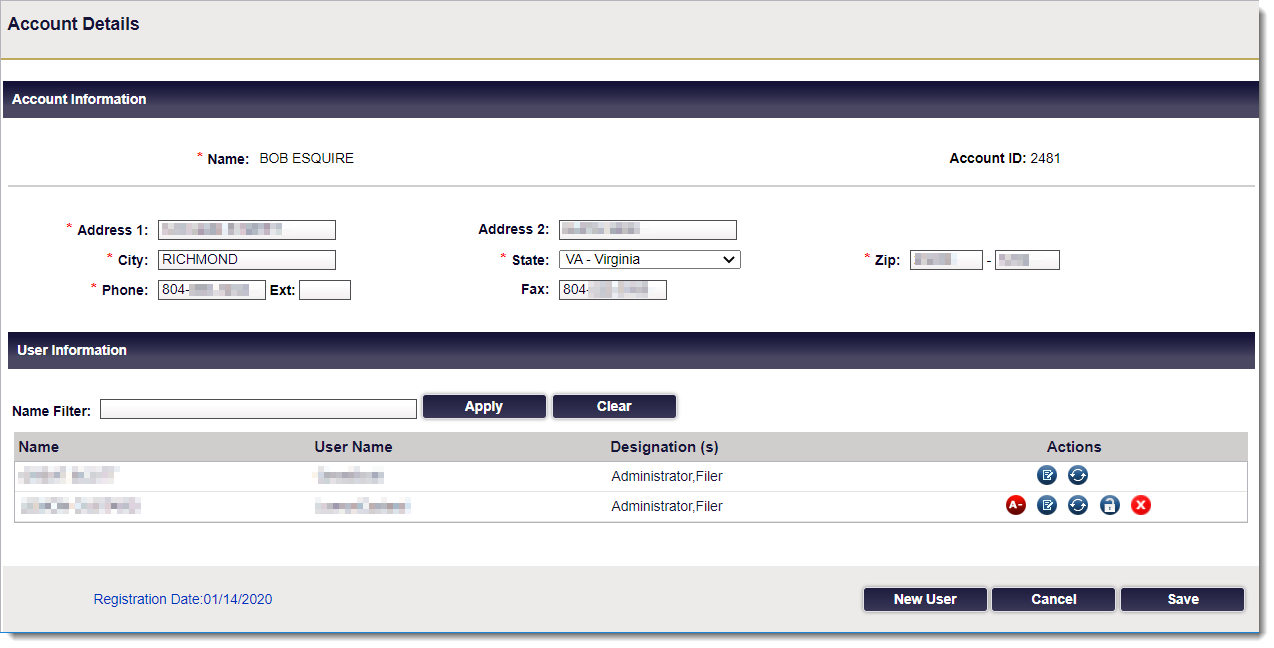
This feature allows users to manage the Administrator’s account and perform administrative tasks on behalf of the Firm and its users. See Account Management for further details.
Settings and User Profile
The Settings link allows users to view their User Profile and update
their Account Information and Personal & Contact Information.

See Settings/User Profile for further details.
Navigate To
Users with access to multiple Virginia Judiciary Electronic Systems (VJCS, VACES, GALR, etc.) can click
the  link and the system will route users to the system selected.
Help
Users can click the  icon and the system will route users to the VACES User Help in a new browser window.
Logout
Users can click the  icon to log out of VACES securely. When clicked, the system will route to the Login screen.
eFiling Submissions
New Filing and Case information
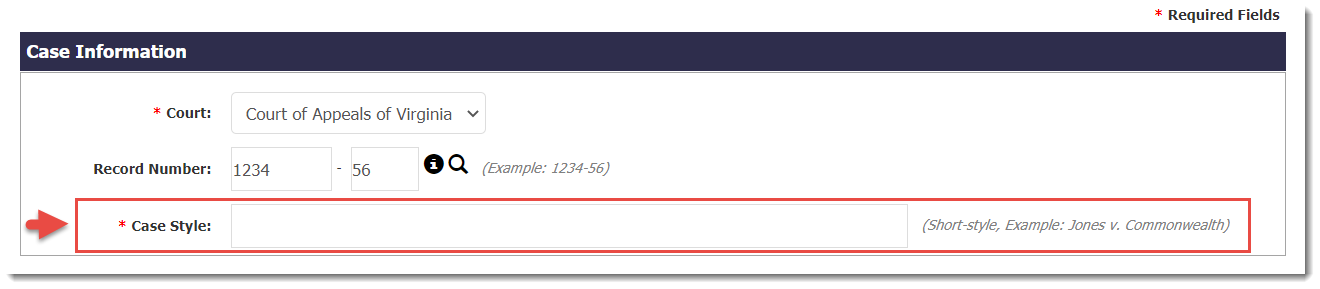
- From your VACES Home page, click New Filing to enter case information and upload documents for eFiling.
- Select Supreme Court of Virginia or Court of Appeals of Virginia.
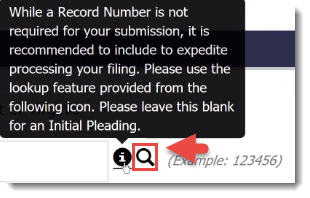
- In the Case Information section, enter the Record Number.
Note: an initial pleading will not have a record number.

- Hover over the Information
 icon for details about Record Numbers and how to expedite your filing.
Note
: If you don’t have a Record Number, click the Magnifying glass  icon
to search for a Record Number. This will take you to the appropriate court site for your use.
icon
to search for a Record Number. This will take you to the appropriate court site for your use.
- Enter the Case Style using the Short-Style.
Note: Short-Style Example: Jones v. Commonwealth.
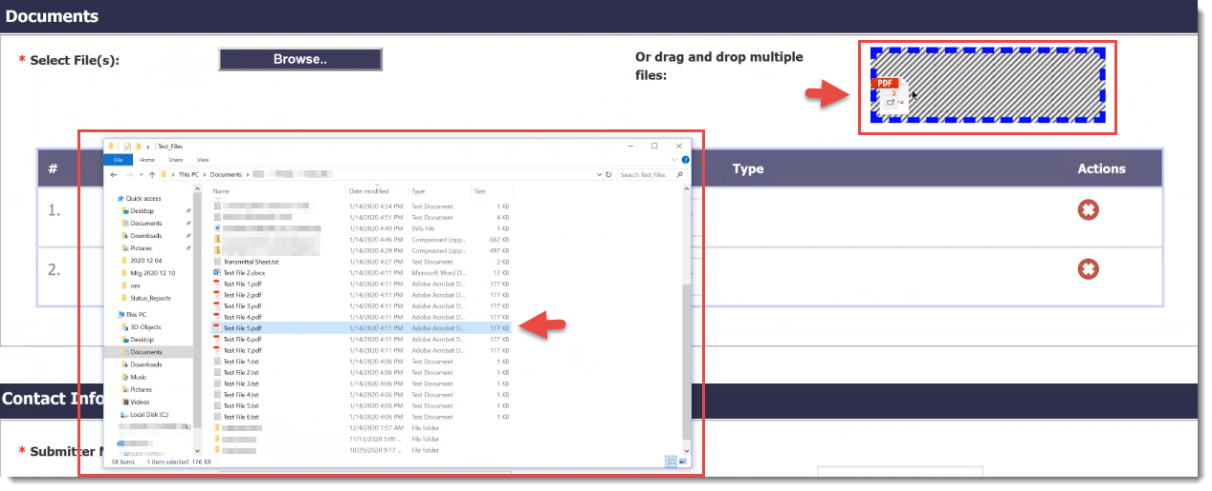
Documents
- In the Documents section, click Browse to locate the file(s) for submission. A system window will appear to select the file(s) to be uploaded.
Important Note: VACES only accepts PDF documents. Single or multiple documents can be selected for upload.

- Highlight the file (or files) needed and then click OK or Open.
The document will appear in the Documents section with the file name in the Name section.
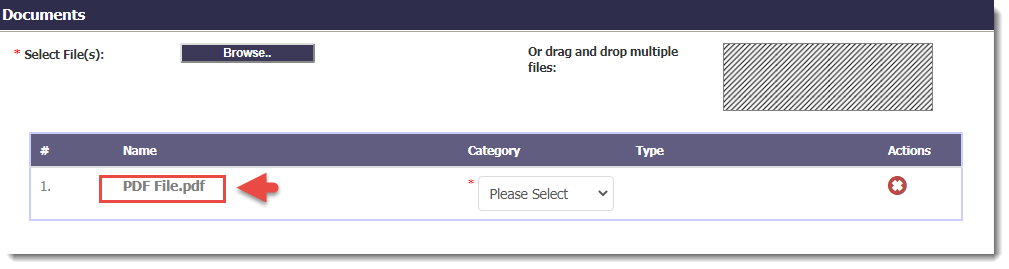
-
Repeat the steps above, as needed, until all required files are imported.
-
As an alternative, the user may select the documents needed, and drag and drop multiple files into the patterned box.
Selecting Category and Type
- Select the Category and Type from the drop-down lists for each
document uploaded.
Note: For eFilings with the Court of Appeals of Virginia, a free
form box may appear. Enter the title of the document you are filing into the free form field (Expetition for appeal, appellee’s brief, motion for extension of time, correspondence, etc.).
-
To delete any unwanted files, select the red X icon in the Actions column.

Fee Information
- If applicable, the Fee Information section will appear after your document selections are made.
- You can also check the box to Request/Claim Exemption.
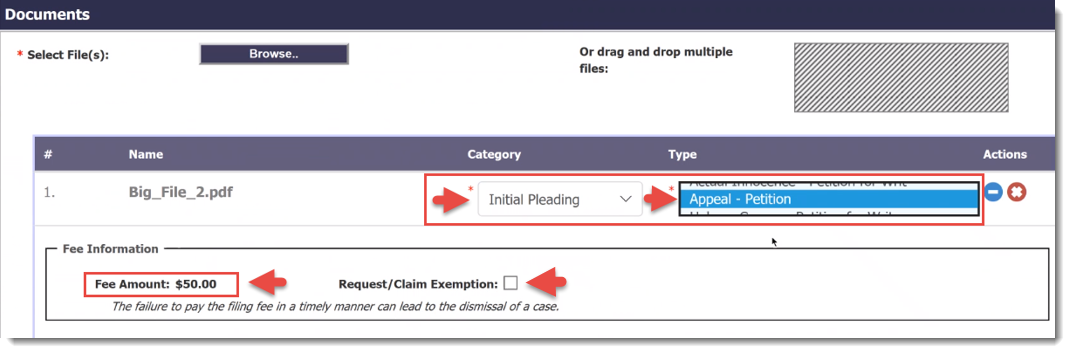
Note: Fees only appear for documents that require a fee to submit (typically petitions, notices of appeal, and pro
hac vice applications). Other documents that do not have a fee will have no fee information listed. When the fee exemption is requested, then a selection from a list of Exemption Reasons is necessary.
Certificate Information (Supreme Court of Virginia filings only)
Note: This section applies only for specific document types for filings to the Supreme Court of Virginia. See Rule 5:17(c).
Some Document submissions for the Supreme Court of Virginia prompt for certificate information and certain selections will appear in the drop downs based on the type(s) of document(s) being submitted.
As shown below, the Category of Initial Pleading was chosen. Then Appeal – Petition was selected in the drop-down list for the Type.
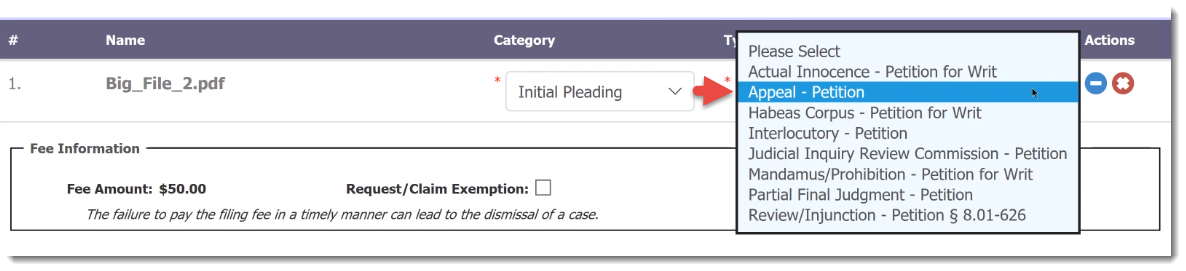
Because the Category and Type of submission of this document were selected
with the options in the example, the Appellant Information section and the Appellant Counsel Information section appeared. Selection of other document categories and types provide for adding Petitioner and
Respondent information.
The Appellant Information section has a drop down to select Person or Business/Entity.
As shown below, Person was selected. There is also an option on the right side, to add an Alias.
- Fill in the Name boxes in the Appellant Information section. If there is more than one appellant, click Add More.
- If desired, click Alias to add an Alias for a Person or a Business/Entity.
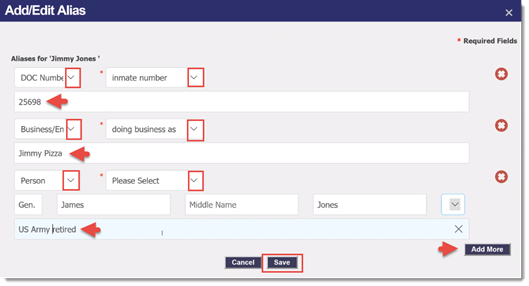
The Add/Edit Alias window will appear.

- Review the drop-downs in the Add/Edit Alias window for the various selections. Fill out the selections and click
Add More, if needed. In the example below for “Jimmy Jones”, there is a DOC Number or inmate number, a DBA for Business/Entity and
a former Armed Forces title for Person.
- When all Aliases are added, click Save. The system will navigate back to the Appellant Information section.
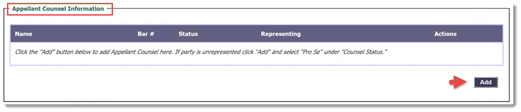
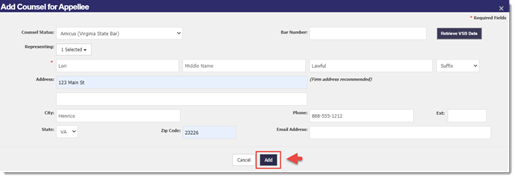
- Click Add to add the Appellant Counsel Information. The Add Counsel for Appellant
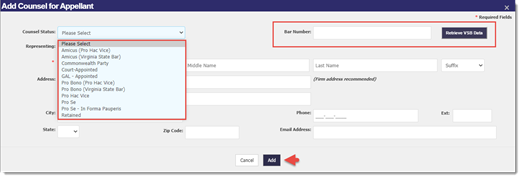
screen will appear.
- Select the Counsel Status from the drop-down list and enter all other Counsel information in the boxes provided.
- Enter the Bar Number. Click Add.
Note: If needed, to access Virginia State Bar (VSB) information, click Retrieve VSB Data.
- When all the information for Appellant and Appellant Counsel Information is entered, also enter all the information for the Appellee and the Appellee Counsel Information in the boxes provided.
- When the Appellee and Appellee Counsel Information entries are complete, click Add to enter.
Other Information (Supreme Court of Virginia filings only)
Note: This section applies only for specific document types for filings to the Supreme Court of Virginia.
Certification and Tribunal (See Rule 5:17(i))
- In the Certification section, select the Service By type in the drop-down
list.
Note: These sections are dynamically shown based on the selected Document Type.
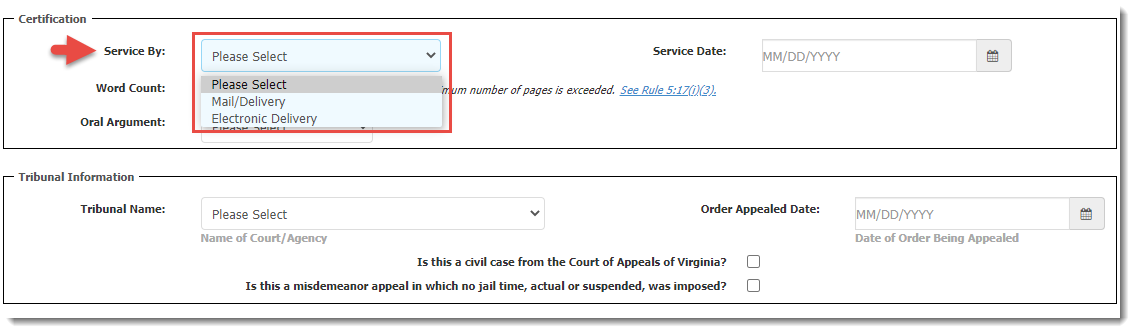
- In the Oral Argument drop-down, select the Argument Type from the list.
Note: see the note and rule on Word Count on the screen and enter, if needed.
- In the Service Date section, enter the service date.

- In the Tribunal Information section, scroll down to select the Tribunal Name from the drop-down list.
- In the Order Appealed Date section, enter the date of order being appealed.
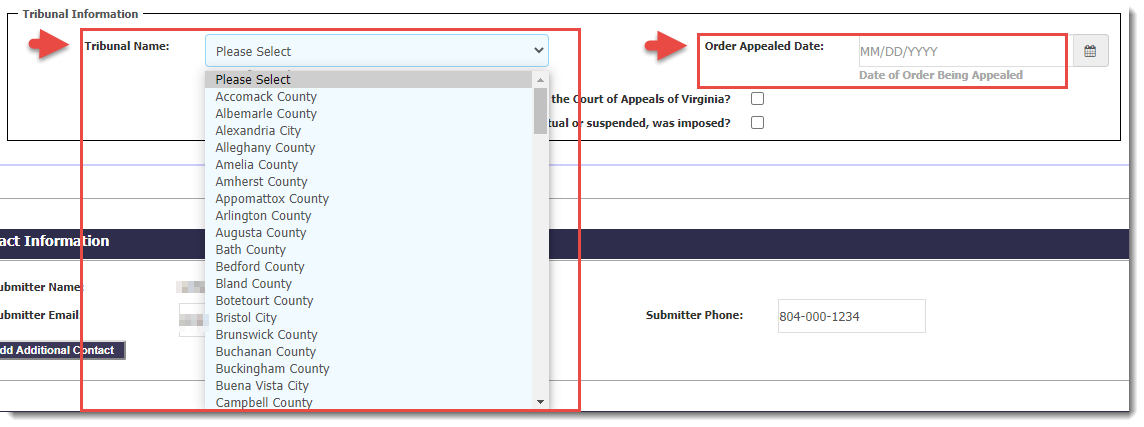
- Check all boxes that apply.

Contact Information
- In the Contact Information section, enter or edit the information, if needed.
Note:
The system will populate Contact Information fields with the user’s information associated with the account.
- If more than one contact entry is needed, click Add Additional Contact.

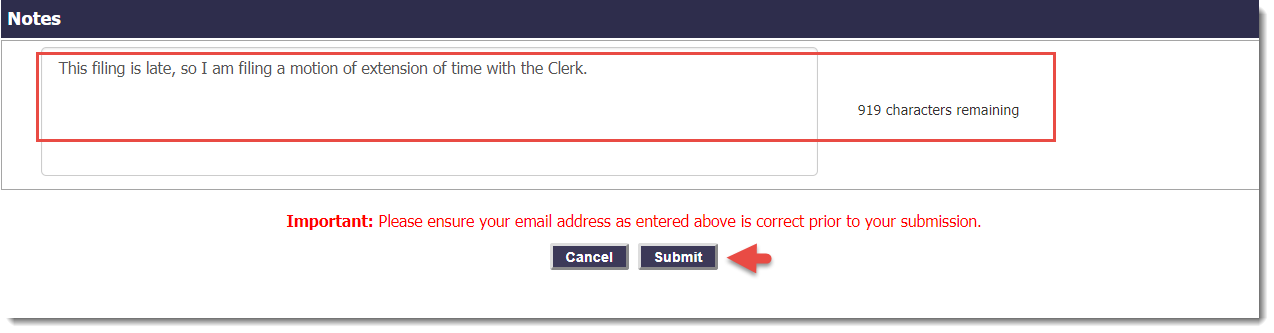
Notes
For each eFiling submission, you may enter any pertinent notes in the Notes text box. The box has a 1,000-character
limit and the message on the side of the text box will indicate how many characters remain.
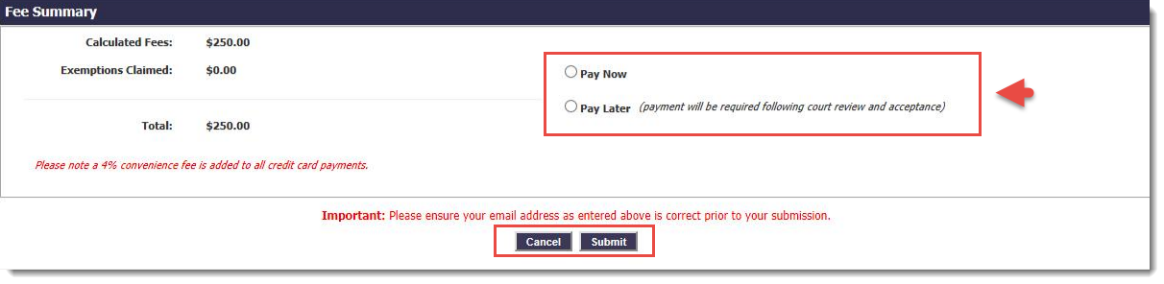
Fee Summary
The Fee Summary appears below the Notes section. The Summary is for fees that will be due once certain documents have
been submitted and accepted.
Note: Fees are displayed only if any documents that require fees (as determined by the selected Document Type) are to be uploaded. Also, fees will not be displayed if the box
to Request/Claim Exemption was checked.
- Review the Fee Summary.
- If present, select Pay Now or Pay Later to continue.
Note: Pay Now and Pay Later option will not be displayed when exemption has been requested for all applicable fees. See also, Payment Processing,
for more information on how to pay fees.
Filing Submission and Document Upload
- Once all case information is entered and all required PDF attachments are listed, at the bottom of the page, click Submit to submit your Filing and upload your document(s).
- For a larger document upload, the file upload progress screen may appear and display the progress of the file(s) being uploaded by the system; for a smaller upload it may flash briefly or not appear at all.
- If during an eFiling submission, a filer encounters an issue during the upload process of a document, the system will prevent further document uploads and the filing will need to be resubmitted.
Submission Summary
Once the system completes the upload process, a confirmation screen will display confirming the user’s Submission Summary for the filing in which the documents were attached. The system will indicate if the submission was successful and case details will display.
- Users may wish to print the confirmation of the submission; to print it, click the Printer Friendly Version button
on the top right of the page.
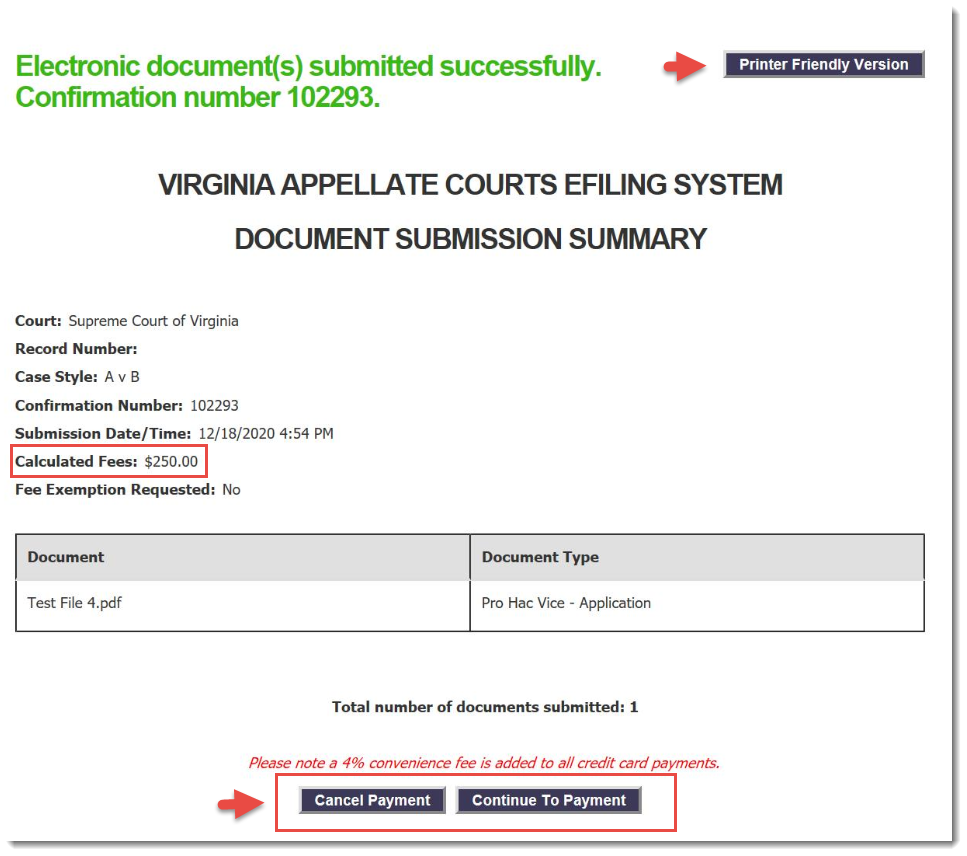
- Scroll down to view the Calculated Fees section. See also, Payment Processing, for
more information on paying fees and providing credit card information.
Appendices
Page Numbering
Page numbering should begin with the first page of the body of the brief or appendix, starting with number
1. Any pages preceding the first page of text, (i.e., tables of contents and tables of authorities), shall be numbered with lowercase Roman numerals (i, ii, iii, etc.). The cover page of the brief or appendix
shall contain no page number.
Note: VACES will not accept documents that exceed 150 MB in file size. If the brief or appendix file size is larger than 150 MB,
it must be uploaded as separate documents, with each volume containing a Table of Contents for that volume. A volume shall not begin or end in the middle of a document.
Hyperlinks
Hyperlinks are permitted but not required. However, the use of hyperlinks is limited to other portions of the same electronic document or other documents filed in the appeal; documents filed in the lower tribunal that are part of the record on appeal; and authorities included in the same file as the brief or appendix.
Note: Hyperlinks to external sites are prohibited
.
Filing and Service of Briefs and Appendices
- The electronic version shall be transmitted to the Clerk and each counsel of record or self-represented party by 11:59 PM on the deadline for filing such brief or appendix.
- If a brief is electronically transmitted on a weekend or holiday, it will
be considered filed as of the next business day and all deadlines affected by the filing date (i.e., deadlines for filing the appellee's brief and the appellant's
reply brief) shall be calculated from that filing date.
- Electronic briefs are required to be emailed to counsel or parties simultaneous with the electronic filing thereof.
- If feasible, the appendix should also be simultaneously served. However, if the file size of the appendix makes
it impossible to transmit by email to counsel, the appendix shall be uploaded to a CD or other form of electronic transmission and mailed to counsel within one business day of its electronic filing with the
Court.
- No paper copies are required to be filed with the Clerk of Court or provided to counsel.
- If self-represented parties have not provided an email address, one paper copy of any brief or appendix shall be
mailed to those parties within one business day of the electronic filing with the Court.
- The electronic briefs and appendix shall be considered the official version of the briefs and appendix in the case.
Sealed Documents
Sealed briefs and appendices must be clearly marked as such on the cover page of the document. Each page of a sealed
document must be watermarked at not more than 10% opacity with the word SEALED in red Arial font, scaled relative to target page,
and rotated across the page at a 45° angle. In the event that the appendix contains some sealed documents, those sealed documents must be collected in a separate volume of the appendix, clearly marked as sealed.
- Sealed documents must be transmitted by mail or commercial courier service to opposing counsel and not emailed.
- If the briefs or appendices include some passages that must be redacted for the public, both a redacted brief or
appendix and an unredacted brief or appendix, must be filed with the Court, served on counsel, and must be clearly marked as such.
- All information required by law to be redacted (e.g., social security numbers) shall be redacted for all briefs
and appendices, whether those briefs or appendices are for the Court and counsel, or for public view.
Retention Requirements
Counsel shall retain paper and electronic versions of the briefs and appendices for at least one year after issuance
of the mandate by the appellate court.
Signature
A handwritten signature is not required on the briefs. See Rules 5:26(h), 5A:20(h) and 5A:21(h).
In lieu of a handwritten signature, the brief may be digitally signed using the conventional electronic signature "s/."
Technical Failures
A person who files a document electronically shall have the same responsibility as a person filing a document in paper form for ensuring that the document is properly filed, complete, and readable. However, if technical problems with the VACES result in a failure to timely receive the electronically filed brief or appendix, counsel shall provide to the clerk of the appellate court on the next business day:
- All documentation which exists demonstrating the attempt to electronically file the brief or appendix;
- Any error message received in response to the attempt;
- Documentation that the brief or appendix was later successfully resubmitted, if applicable; and
- A motion requesting that the Court accepts the resubmitted brief or appendix.
Note: If the document was intended to be filed with the Supreme Court, the documentation regarding the technical failure may be submitted via VACES to the Clerk of the
Supreme Court of Virginia.
If the document was supposed to be filed with the Court of Appeals of Virginia, the documentation regarding the technical failure may be submitted via VACES to the
Court of Appeals of Virginia.
Orders and Notices
The Court may transmit notices, orders, and other documents electronically.
Payment Processing
When submitting documents, some eFilings require fee(s) that will need to be paid. Please note that fees will only be charged after the court has reviewed and accepted the filing submission.
Important: Failure to pay filing fees by the assigned due date, as determined at acceptance, will lead to case dismissal.
Use the following instructions to view the different ways to pay fees electronically, during document submission, from the home page, or from the Invoice Payment Due email. During document submission, use Pay Now to provide credit or debit card information or use Pay Later to receive an invoice at a later date.
You can also review payment due notifications, view and pay invoices, and review invoices.
How to Pay Fees
Pay during Document Submission
You may use the Pay Now option once the system completes the document upload process. The payment card will be charged
after the court has reviewed and accepted the eFiling submission. A Submission Summary will display confirming the user’s eFiling submission in which the documents were attached. This screen will note the submission
was successful and display the filing details.
- In the Submission Summary, view the Calculated Fees section and scroll to the bottom of the page to see the
Cancel Payment option or Continue To Payment option.
- Click Cancel Payment to cancel the present payment process therefore opting to receive an invoice to pay at a later
time.
Important Notes: An email to confirm eFiling submissions will be sent to all the email addresses provided during the submission, and will contain the submission and case details. Once the eFiling is reviewed
and accepted by the court, users will get another email to confirm that the submission was accepted. If fees are due, an email with an Invoice will then be sent, requiring the payment of the fees due. Failure to pay filing fees by the assigned due
date, determined at acceptance, will lead to case dismissal.
- To Pay Now, select Continue To Payment.
- The Payment Screen with the Billing Details section and Product Details section will appear.
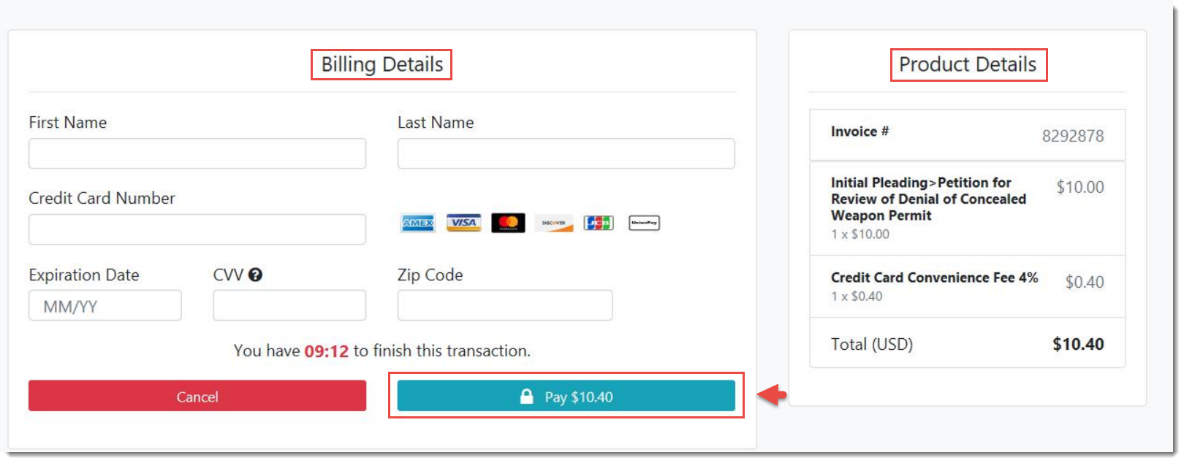
- To Pay, complete the requested information and use the Pay button; for more information see the Payment Screen section.
- Click Cancel to return to the previous screen.
Pay from the Home Page
During the eFiling process, if you chose to Pay Later, one option is to go to your VACES home page and review the Filings Pending Payment section
at the top of the page.
Note: Filings opted to pay later will display here only after the court has reviewed and accepted your filing.
- Each eFiling includes the Case Style, the Record number (optional), the Court, the Submitter of the eFiling, the Fee Total, and the Fee Due Date.
- After review, to pay for one of the eFilings, locate the Case Style names or Record number (optional) in the list, review the Fee Total, and click the black dollar sign
 icon in the Actions column to pay the fee.
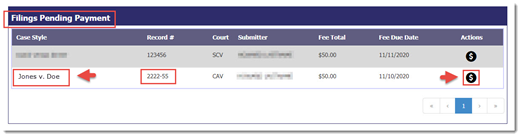
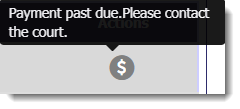
- Be aware that once the Due Date for the fee has passed, the dollar-sign icon becomes disabled and the user must contact the court manually. The icon will display a ToolTip instructing this in the Filings Pending Payment section and will show a grayed dollar sign. When you try to click the icon to pay the fee, the message will appear that the payment is past due. Contact the court that received the eFiling to discuss any past
due fees.
- After clicking the black dollar sign icon, the Payment Screen with the Billing Details section and Product Details section
will appear.
- To Pay, complete the requested information and use the Pay button; for more information, see the Payment Screen section.
- Click Cancel to return to the previous screen.
Pay from Invoice Payment Due Email
When an eFiling has been submitted through VACES, and Pay Later was selected, after review and acceptance by the court, the system will send an email with the Subject line “Appellate Court Invoice Payment Due” to all the email addresses provided during the submission.
- Review the Invoice Details. The details include the Invoice Number, Case Style Description, Record number (optional),
type of eFiling, Fee Total, and Due Date.
Note: You may also view a print-friendly PDF invoice that is attached to the email.
- To view and pay the invoice, click the hyperlink at the bottom of the email. The View Invoice page will appear.
Note: To view the printable version of the invoice, click Download Invoice.
- Click Pay Invoice to pay the fees by the due date listed. The Payment Screen will appear next.
- Click Cancel to return to the previous screen.
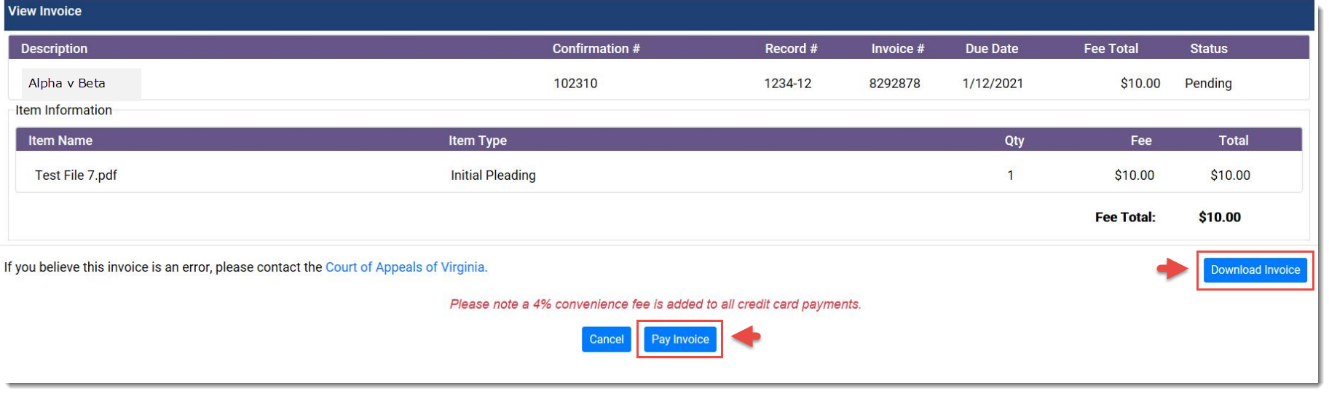
Important Note: Failure to pay filing fees in a timely manner will lead to the dismissal of your case.
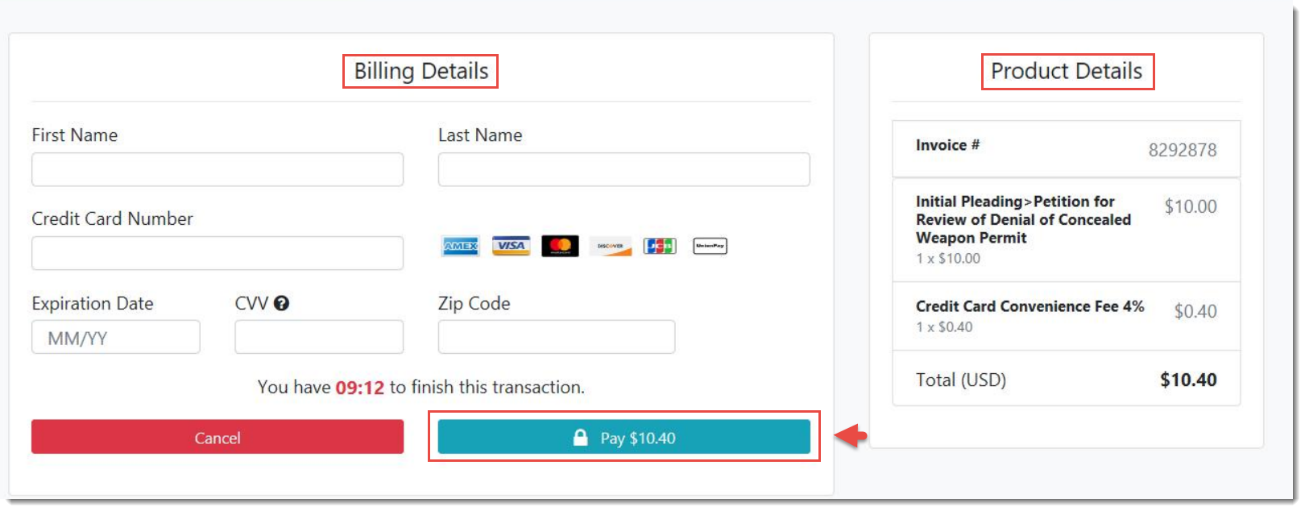
Payment Screen
The Payment Screen has a Billing Details section and a Product Details section
for review.
- Enter the name, all required credit card information, and click Pay. The View Paid Invoice page will appear.
- Click Cancel to return to the previous screen.
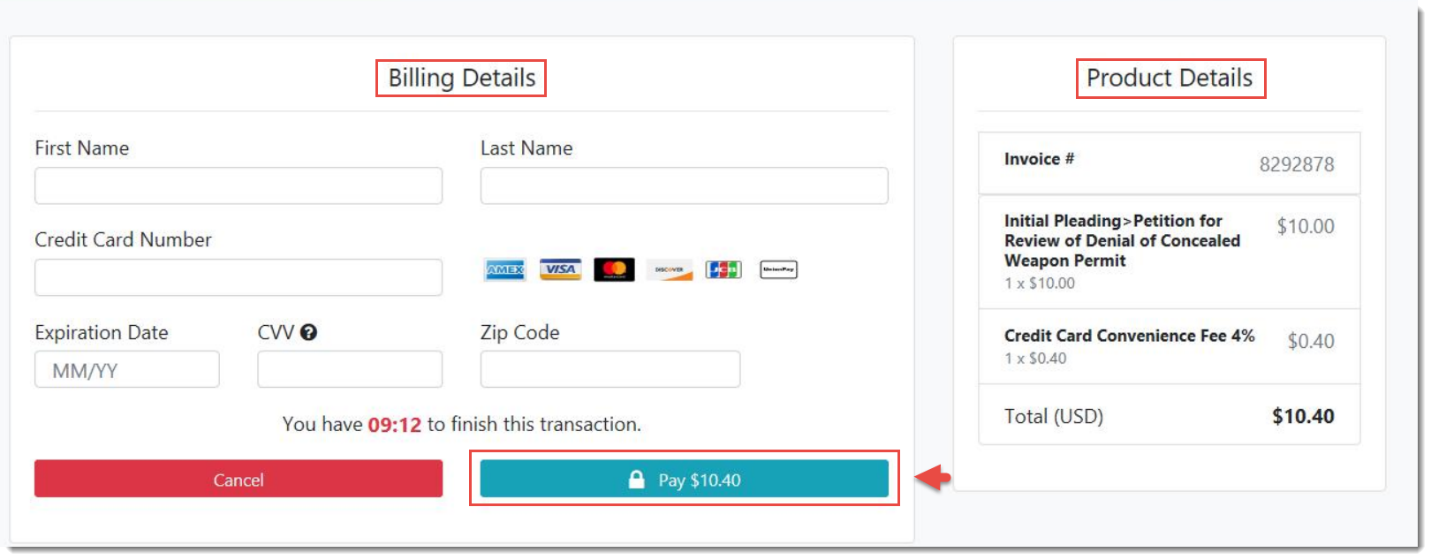
Note: There is a time limit and countdown noted to finish the transaction.
View Paid Invoice
After the invoice Payment is complete, the View Paid Invoice page will appear to indicate that payment.
In addition, a Court Invoice Paid notification will be sent to the email address associated with the account.
Account Management
This section is for users designated as an Administrator for an attorney, law firm or organization. Administrators
must ensure that users' equipment and software meet the VACES system requirements, which are accessible in the Terms and Conditions of Use (End User License Agreement).
- In order to use this system, browser cookies must be turned on.
- It is the Administrator’s responsibility to communicate User Names and Passwords to their Firm’s new users.
- All fields indicated with an asterisk (*) are required and must be completed.
Add New User
To add a new user’s account:
- Click Account Management and then select the Account / User Management option
in the drop-down. The Account Details screen will display.

- Click New User at the bottom of the screen. The New User Registration screen will display.

-
In the User Information section, from the radio button options, select one of the user’s Role Types below:
- Administrator Only
- Administrator/Filer
- Filer
- Enter the User’s Name, Address, Phone Number, Email address, User Name and Password, and all other information in the fields provided. Required fields are indicated by a red asterisk.
-
Note: If the user’s address is the same as the Firm, check the Same as account address box. If the address is not the same as the Firm’s address enter the user’s address.
-
Click Submit at the bottom of the page. A confirmation screen will display indicating that the new user has been
registered successfully.
Edit Existing User
To edit an existing user’s account:
- Click Account Management and then select the Account / User Management option
from the menu bar. The Account Details screen will display.

- Click the Edit
 icon located next to the appropriate user's name. The Edit User screen will display.
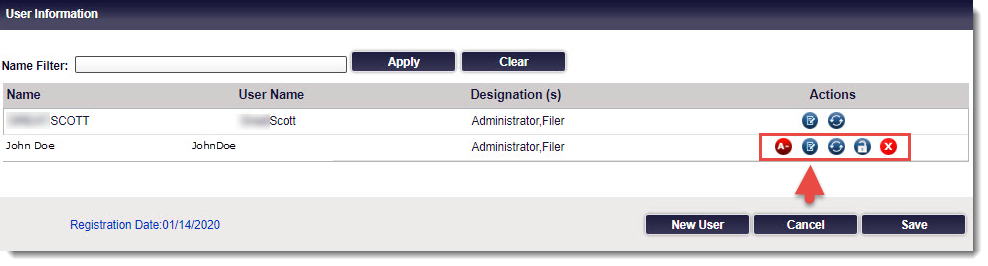
- Edit the User Information to make all necessary changes and then click Submit.
A confirmation screen will display indicating that the user’s account updated successfully.
Note: The system will generate an email confirmation to the user that the account has been updated.

Delete User
Important Note: Administrators cannot delete their own account
while logged into the system because the icon needed for this action is not available. Another administrator is required to complete this type of action.
To delete a user’s account:
- Click Account Management and then select the Account/User Management option from the menu bar. The Account Details screen will display.
- In the User Information section, click the delete
 icon located next to the appropriate user's account. A dialog box will display.
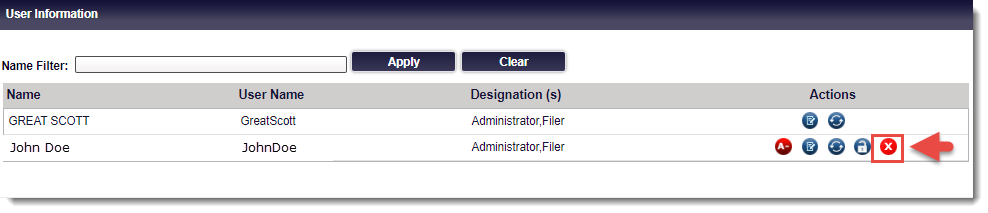
- The dialog box will ask if you are sure you want to delete the account:
- If Yes, click OK to continue deleting the account. A confirmation screen will display indicating that the account deleted successfully.
-
If No, click Cancel to abandon the action. The system will return to the Home screen.
Note: If the user has access to multiple Virginia Judiciary Electronic Systems (VJCS, VACES, GALR, etc.),
deleting them from one system will not delete them from the other(s).
Action Icons
The action icons located on the right of the user’s name provide Administrators the ability to perform the tasks below :
 Enables (grants) Administrator privileges
 Disables (removes) Administrator privileges
 Edits user’s account information
 Resets user’s password
 Unlocks user’s account
 Deletes user accounts from the current system.
Settings/User Profile
The Settings tab permits users to make updates to their User Profile or change their security questions and VACES
password.

Users can perform the functions below:
- Make updates to their profile
- Change Security Questions and/or Security Answers.
- Reset the VACES password.
Users can update any information regarding their profile, with the exception of their User Name. User Names cannot be changed once set by the Administrator. The User Profile screen contains the following elements:
- Account Information
- Personal & Contact Information
- Change Password
Note: If the Firm has access to another system, like VJCS, changing the user’s password will change the password to
that system, as well.
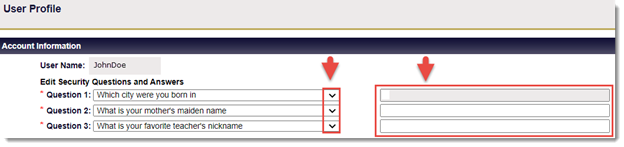
Account Information/Security Questions
The Account Information section provides users the ability to edit and/or change their security questions and/or answers. Using the drop-down lists, users can perform the following tasks:
- Select and answer new security questions
- Change the answer to existing security questions.
To change the Security Questions and/or Security Answers in the Account Information section, use the following instructions.
- Open a web browser, navigate to the VACES Login page and enter User Name and Password. The Home page will appear.
- Click Settings. The User Profile will
appear.

- In the User Profile, in the Account Information section, edit the Security Questions and/or the Security Answers, as needed.
- After all needed changes are entered, scroll down to the bottom of the page and click Save to complete the update action. To discard changes, click Cancel.

Note: If you click Cancel, the application with return to the Home screen.
Personal & Contact Information
The Personal & Contact Information section provides users the ability to change personal and contact information
changes, including the following elements:
- Name
- Address
- Phone numbers
- Email address
To change or update any information in the Personal & Contact Information, use the following instructions.
- From the VACES Home page, click Settings. The User Profile page will appear.

- In the User Profile, scroll down to the Personal & Contact Information section and enter any needed changes.
- After changes are entered, click Save to complete the update action. To discard changes, click Cancel.

Note: If you click Cancel, the application will return to the Home screen.
Change Password
If the Firm’s users have access to other Virginia Judiciary Electronic Systems (VJCS, VACES, GALR, etc.), changing the user’s password will change the password for all other systems as well as the VACES.
Similarly, password resets will apply for all registered Virginia Judiciary Electronic Systems (i.e., VJCS, VACES, GALR, etc.).
Passwords must meet the following criteria:
- Be at least eight characters in length;
- Must not contain the account user name or portion of the user name; and
- Must use at least three of the following four characteristics:
- English upper case letters (A-Z);
- English lower case letters (a-z);
- Numbers (0-9); and Special characters (!@#$*)
- Users are required to change their passwords every 90 days.
- Passwords may not be re-used.
- Users can change or request a new password from their VACES administrator or backup administrator.
Password Reset
To reset a login password, use the following instructions.
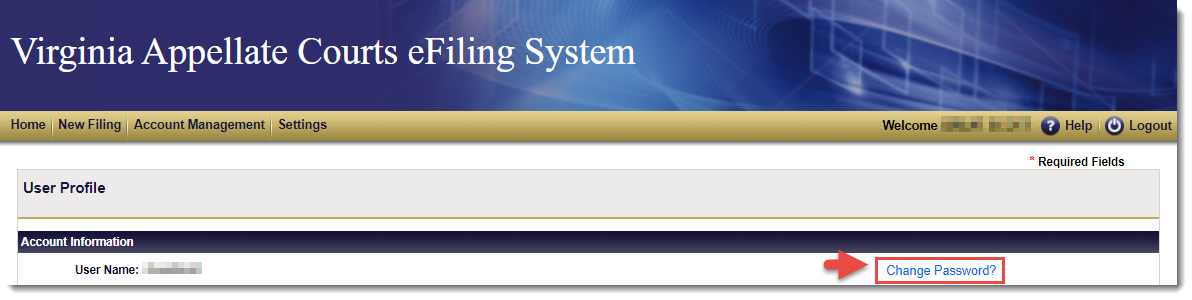
- From the VACES Home page, click Settings. The User Profile screen will appear.

- In the Account Information section, click the Change Password link located on the right side of the screen.
- A Change Password screen will display.
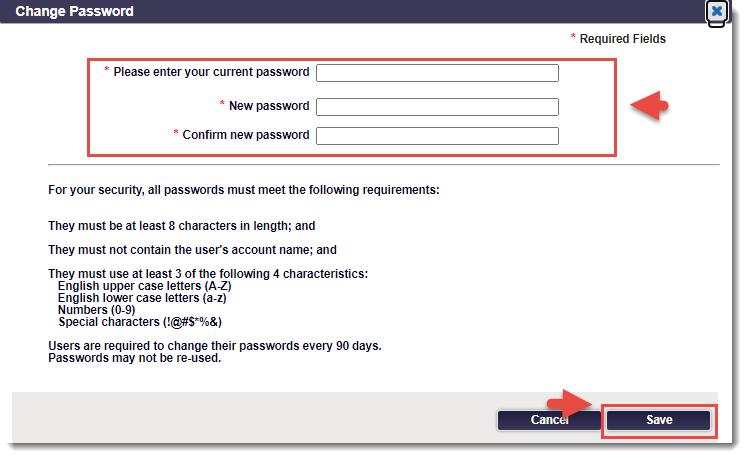
- Enter the current password into the Please enter your current password field.
- Create a new password and enter into the New password field.
Note: The same password may not be re-used.
- Re-enter the password into the Confirm new password field and the system will update the password change.
- Click Save to continue.
Note: To discard changes, click Cancel. The application will display a message indicating all information entered will be discarded
and then request confirmation of the action.
- A message will appear indicating that it may take up to five minutes for the system to synchronize after resetting the password.
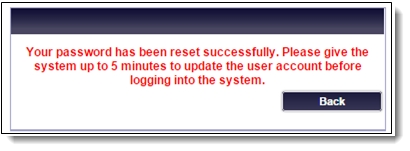
- Click Back to return to the User Profile screen.
Forgot User Name
Users who have forgotten their Login User Name must contact the Firm Administrator who can retrieve their User Name from the Account Details screen.

Forgot Password
To reset a forgotten password, use the following instructions.
- From the Login screen, click the Forgot Password link. The Forgot Password screen will display.
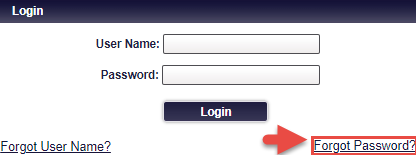
- Enter the User Name and click OK.

- The Forgot Password screen will display the User Name entered and the security questions chosen during the
initial login setup.
- Provide the answers entered to the security questions during the initial login setup.

- Click Submit. A message will display indicating an email notification will be sent with a new (temporary) password
to the email address associated with the account.
Important Notes: It is advised that the user log into the system as soon as possible where the system will require the user to change this password upon login. If the user did not request a password reset, contact the Firm’s Administrator for further assistance.
- Navigate to the Login page.
- Enter the User Name and the Temporary Password provided in the email.
- Click Login. The system will route to the Password Reset screen. Users will see a password expiration message instructing the user to set a new password.
- Create and enter a new password in the Please enter your new password field.
- Re-enter the password in the Please confirm your new password field.
Note: If the passwords do not match or do not meet the minimum password requirements, an error message will appear. See the password criteria above within this section.
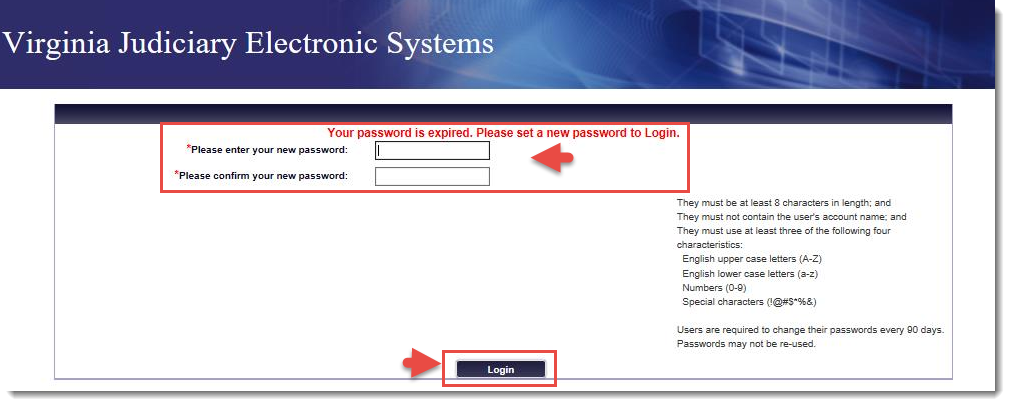
- Click Login. A message will display indicating the password reset was successful.
Appendix A – Document Types for eFilings
Depending on the Court selected from the drop-down option list when completing the Documents section on the Submission screen, users have the ability to choose one of the Document Types below for each document listed. The Document Type is a mandatory field and must be selected.
Supreme Court of Virginia (SCV)
When users select the Court drop-down list option Supreme Court of Virginia, the Document Types listed below will display:
|
Document Categories
|
Document Types
|
|
Initial Pleading
|
Actual Innocence - Petition for Writ
|
|
Initial Pleading
|
Appeal - Petition
|
|
Initial Pleading
|
Habeas Corpus - Petition for Writ
|
|
Initial Pleading
|
Interlocutory - Petition
|
|
Initial Pleading
|
Judicial Inquiry Review Commission - Petition
|
|
Initial Pleading
|
Mandamus/Prohibition - Petition for Writ
|
|
Initial Pleading
|
Partial Final Judgment - Petition
|
|
Initial Pleading
|
Review/Injunction - Petition §8.01-626
|
|
Motion/Request
|
Amend/Supplement
|
|
Motion/Request
|
Amicus
|
|
Motion/Request
|
Appointment of Counsel/Public Defender
|
|
Motion/Request
|
Bill of Costs
|
|
Motion/Request
|
Certiorari
|
|
Motion/Request
|
Defer Mandate
|
|
Motion/Request
|
Delayed Appeal
|
|
Motion/Request
|
Dismiss, Deny, Strike
|
|
Motion/Request
|
Extension of Page Limit/Word Count
|
|
Motion/Request
|
Extension of Time
|
|
Motion/Request
|
IFP Affidavit
|
|
Motion/Request
|
Miscellaneous/Other
|
|
Motion/Request
|
Response to Motion or Objection
|
|
Motion/Request
|
Pro Hac Vice - Motion
|
|
Motion/Request
|
Pro Hac Vice - Application
|
|
Motion/Request
|
Reconsider
|
|
Motion/Request
|
Stay
|
|
Motion/Request
|
Substitute Party
|
|
Motion/Request
|
Withdraw/Substitute Counsel
|
|
Motion/Request
|
Withdraw Case/Motion/Rehearing
|
|
Subsequent Pleading
|
Amended Pleading
|
|
Subsequent Pleading
|
Amicus Curiae Brief
|
|
Subsequent Pleading
|
Designation
|
|
Subsequent Pleading
|
Appellee/Respondent Brief
|
|
Subsequent Pleading
|
Appendix
|
|
Subsequent Pleading
|
Appointment Order from Lower Tribunal
|
|
Subsequent Pleading
|
Brief in Opposition
|
|
Subsequent Pleading
|
Change of Address
|
|
Subsequent Pleading
|
Exhibit(s)
|
|
Subsequent Pleading
|
Letter Brief
|
|
Subsequent Pleading
|
Miscellaneous/Other
|
|
Subsequent Pleading
|
Notice of Appearance
|
|
Subsequent Pleading
|
Notice of Supplemental Authority
|
|
Subsequent Pleading
|
Opening Brief
|
|
Subsequent Pleading
|
Petition for Rehearing
|
|
Subsequent Pleading
|
Petition for Rehearing - Notice of Intent
|
|
Subsequent Pleading
|
Reply Brief
|
|
Subsequent Pleading
|
Reply to Responsive Pleading
|
|
Subsequent Pleading
|
Response to Show Cause
|
|
Subsequent Pleading
|
Responsive Pleading
|
|
Subsequent Pleading
|
Resubmission
|
|
Subsequent Pleading
|
Return/Acceptance of Service
|
Court of Appeals of Virginia (CAV)
When users select the Court drop-down list Court of Appeals of Virginia, the Document Types listed below will display:
|
Document Categories
|
Document Types
|
|
Initial Pleading
|
Notice of Appeal
|
|
Initial Pleading
|
Petition for Writ of Habeas Corpus
|
|
Initial Pleading
|
Petition for Writ of Mandamus
|
|
Initial Pleading
|
Petition for Writ of Prohibition
|
|
Initial Pleading
|
Petition for Writ of Actual Innocence
|
|
Initial Pleading
|
Petition for Review Pursuant to Code § 8.01-626
|
|
Initial Pleading
|
Petition for Review of Denial of Concealed Weapon Permit
|
|
Other
|
Custom Entry
|