OCIS Search Help
The Online Case Information System (OCIS) is used to search court records for an individual or defendant. Review the following instructions to search for a name in OCIS and retrieve case information.
Name Search (All Courts)
Use the following steps to perform a Search By Name in All Courts (the default) in OCIS.
Note: To do a more detailed search, select courts, change other Search Criteria, or to search by case number, see the Customize a Search section.
- Type the name into the Enter a Name here box and tap or click Search .

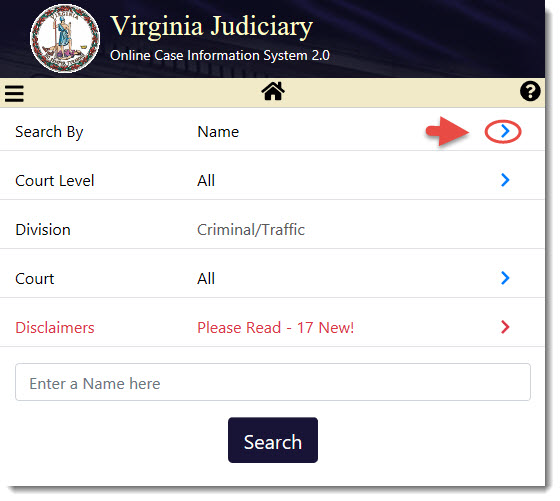
Important Note: For best results, enter the name as it appears on the citation, summons/warrant, or court document. A partial name is allowed (each name entry must have two characters or more) and OCIS will return all results for the name(s) entered. Some Special Characters are retained and include "at" (@), "pound" (#) and "dollar sign" ($). Other special characters (! % ^ & * +=, etc.) will be ignored by the system and replaced by blank spaces when used. - The Disclaimers—Please Read warning is automatically displayed if there is new information to review. Scroll down to view and tap or click Acknowledge to continue.
Important Note: You must tap or click Acknowledge to perform the initial Search. For more information, see Accepting Terms and Conditions.

By default, the Name Search includes All Courts. See Search Results for more information about the search performed.
Note : To customize your search, or change courts, see the Customize a Search section.
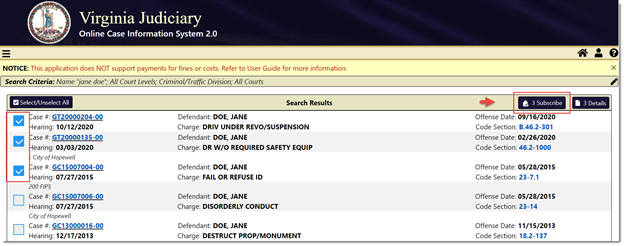
Search Results
The search results will provide limited case information including the Court, Case number, Defendant, Offense Date, Hearing Date, Charge, and Code Section. To see more Case Details, use the following steps.
- For a detailed view of a single case, click the Case Number to view the case.
Note: you can also click the number in the Code Section to link to the Code of Virginia pages for more information.
-
To review two or more cases, select the desired cases in the list by tapping the circle or clicking the box next to each and then tap or click the Details icon.

-
You can also tap the ••• icon on your device and choose View Selected Details to view the details of the selected cases.

-
The Case Details pages will appear. See Case Details for more information.
Case Details
The Case Details pages contain more information about the Defendant, Case/Charge, Appeal, Hearing, Disposition, and Service of Process. Important: J&DR Courts do not display complainant names or service of process information.
Note: There is a Glossary of terms in OCIS User Help that may help with legal terms that appear in the Case Details pages, see Glossary for instructions on how to view those terms and definitions.
- Click the up or down arrow ^ or ˅ to expand or reduce a field, as needed.

- To review the next selected case, or the previous case, tap the > or < arrow icons at the top of the device screen (or click the Next and Previous buttons when viewing the page on a desktop computer).

- To go back to the Search Results from the Case Details screen, tap the Return to Search Results button at the bottom of the page of your device (or at the top and bottom of the page when viewing the page on a desktop computer).
- To edit a search, tap the three dot ••• icon and choose Edit Search Criteria or click the edit icon
 .
. - To begin a new search, tap or click the home icon
 to return to the Search Criteria page.
 - For more information on other navigation buttons and icons, see the Navigation Button Icons chart.
Important: OCIS may display important messages when you are using the search (Notices, Disclaimers, or Error Messages). See Error Messages for more information.
Customize a Search
Perform a customized search by using the Search Criteria to better refine your search results, as detailed below.
- Tap the arrow > in Court Level to select Circuit Court or General District Court or
J&DR Court (Juvenile and Domestic Relations District Court) and tap or click Apply (the default is All Court Levels ) . A checkmark will show you the court levels that are selected.

- Tap or click the arrow > in Court to search within the available courts (default is All Courts ) and tap Apply . A checkmark on the right will show you the courts that are selected on your device (checkmark on the left indicates this on your desktop computer).
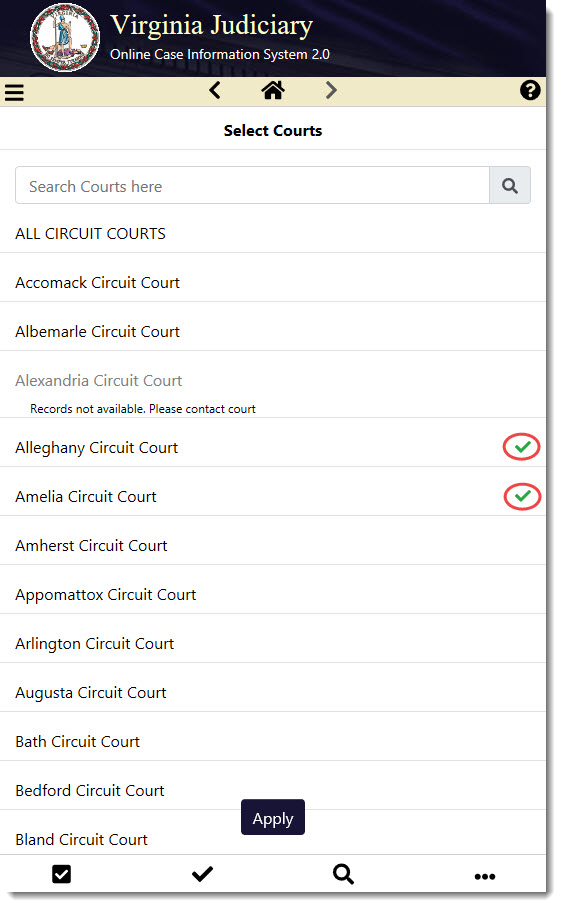
- To look for a specific court, type it in to the Search Courts here box, tap or click the desired court(s) and tap or click Apply .

- After customizing the search criteria, type the individual or defendant’s name into the Enter a Name here box and tap or click Search .
Note: For best results, enter the name as it appears on the citation, summons/warrant, or court document. A partial name is allowed (it must be two characters or more) and OCIS will return all results for the name entered. Some special characters will be ignored. - Tap a Case Number to view the case details, or checkmark 2 or more cases to review multiple cases.
- Tap the numbered Details icon on the bottom left to view the cases selected (or click the Details icon at the top right when viewing on a desktop computer).

Search by Case Number
Use the following instructions to search by Case Number.
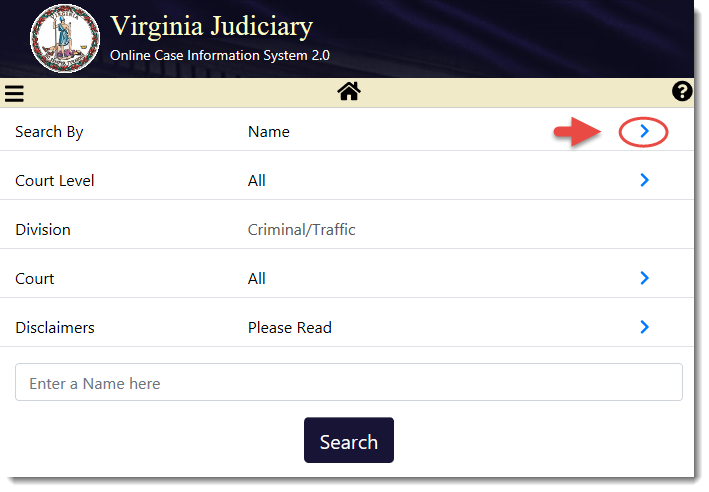
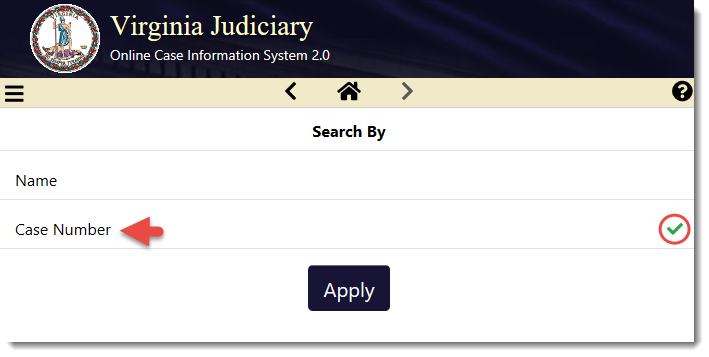
- Tap the selection arrow > in Search By to select the Case Number search option.
- Tap the Case Number section and it will show the change with a checkmark on your device or a marked radial button on a desktop computer. Tap Apply .
- In the Enter a Case Number here box, type in the Case Number. Example Formats: GT12345678-90, CR12345678-90, JA012345-01-00.
- Tap the selection arrow > in the Court section to select the specific court for that Case Number (only one court can be selected for Case Number searches).
Important Note : the Court section changes from All to Please Select , as both the Case Number and the Court must be selected or this type of search will not be performed.

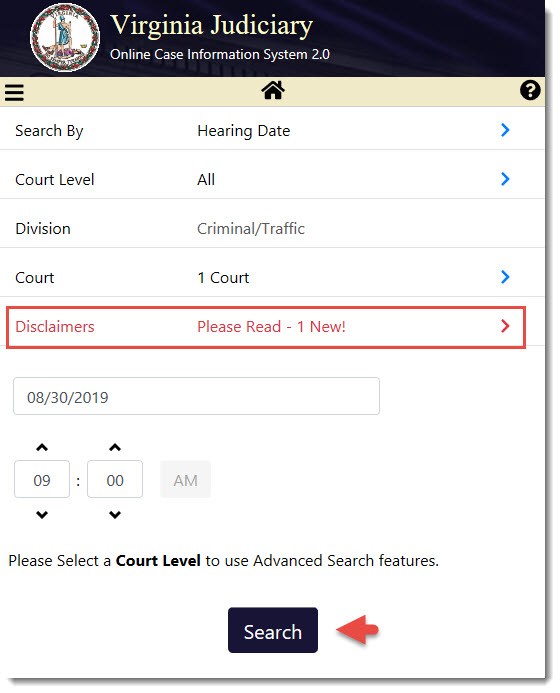
Search by Hearing Date
Use the following instructions to search by Hearing Date.
- Tap or click the selection arrow > in Search By to view the Hearing Date search option.
- Tap or click to select Hearing Date and it will show the change with a checkmark on your device or a marked radial button on a desktop computer. Tap or click Apply .

- To refine your search results, tap or click the Court section to review the listed courts.
Note: You may skip this step if searching All Courts is desired.

- Scroll down to find the court(s) you wish to include in your search and tap or click to select the court(s). The system will show a check mark next to your selections. Tap or click Apply to continue.

- In the Hearing Date box, enter the month, day, and year of the hearing manually (by using the format MM/DD/YYYY), or you can use the pop-up calendar to select the hearing date.
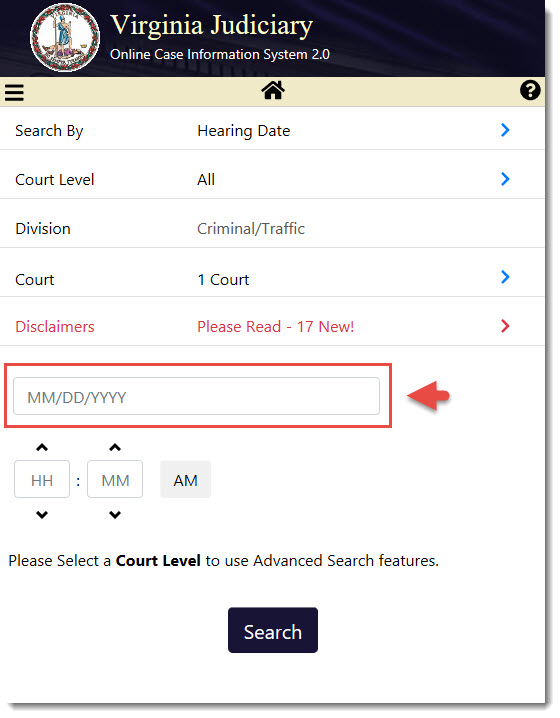
- In the pop-up Hearing Date Calendar, use the < or > arrows to scroll and find the correct month and year, and tap the day of the month to select the hearing date (Friday, August 30 th is the example below).

- After you select a day in the calendar, the hearing date will appear in the date box. You may also refine your search by providing the scheduled time of the hearing. The scheduled time of the hearing may be entered manually in the HH and MM boxes or by using the ^ or ˅ arrows.

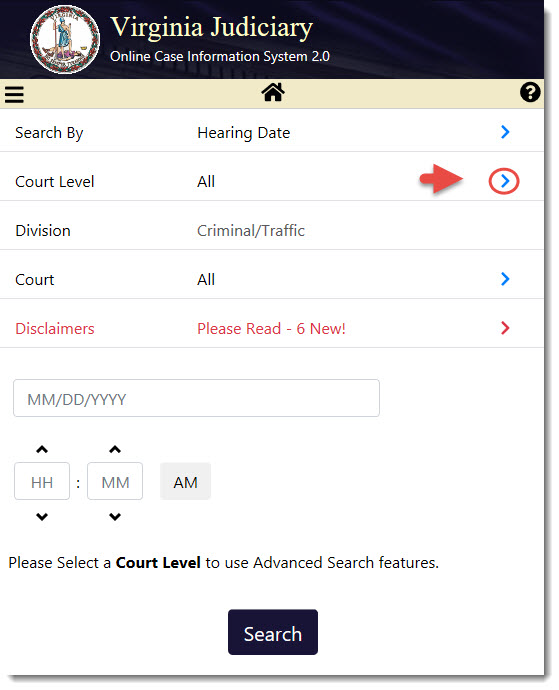
- If the hearing date search is for a General District Court , you may want to use the Advanced Search to refine your results.
- Tap or click Court Level to view the General District Court selection.
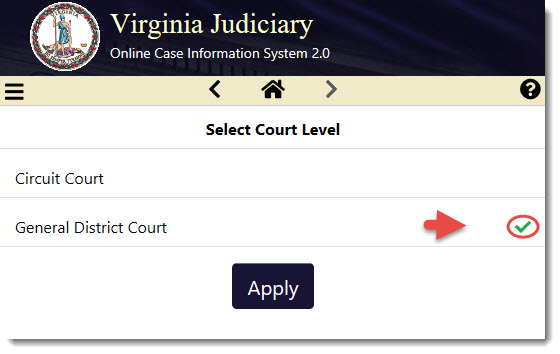
- Tap or click General District Court to select it and the system will show the change with a checkmark. Tap or click Apply to continue.
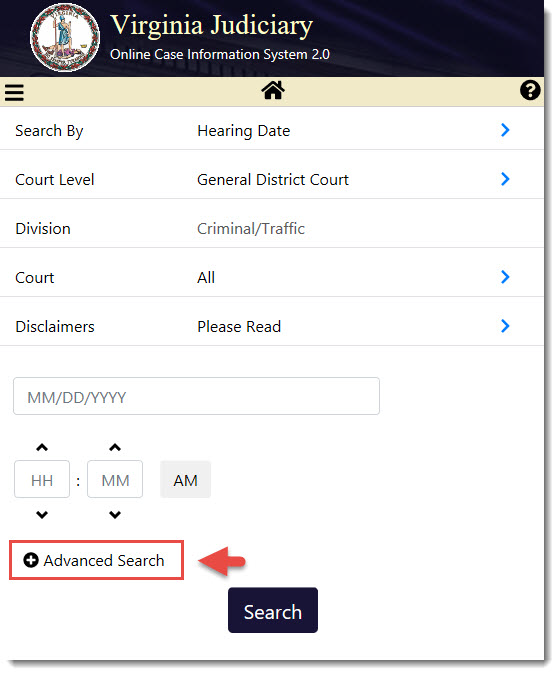
- Tap or click Advanced Search to expand it.
- You may enter the Hearing Type, Courtroom, Complainant Name, or Unit Number in the boxes that appear. Note: Refer to any available court documents for this information.

- To view the Hearing Types, tap or click the > arrow key.

- Tap or click the desired hearing type to select one. A checkmark will appear next to your selection. Scroll down and tap or click Apply. In the example below, AJ - Adjudicatory was selected.

- Tap or click Search to perform the hearing date search.
Important Note: For any search, if you have not done so already, you may have to tap or click the Disclaimers – Please Read section, review the information, scroll down to the bottom of the page, and tap or click Acknowledge.
More Information and Help
Use the following instructions to get more information and alerts about upcoming cases, and to find Menus and Tables of Contents with links to pages with more information and user help.
Case Alert Subscription System
The Case Alert Subscription System (CASS) can be used to receive alerts for an upcoming case. CASS alerts will be sent as an email message or an SMS text message (or both, if desired).
- To subscribe, check the box to the left of each desired case number in the Search Results.
- Click Subscribe.

- The Case Updates page will appear. Enter a cell phone number or an email address and click Send Verification Code.
Note: Any cell phone number entered must be able to receive SMS text messages.

- Retrieve the verification code from the SMS text sent to the cell phone number or from the email message sent to the provided address.
- Enter the code into the box provided and click Log In. If this is a new account, the CASE UPDATES: Accounts Preferences screen will appear.
Note: If you already have an account, when you add cases, you will see the login screen or the CASE UPDATES: Log In and Verification screen and then the CASE UPDATES: Subscription page.

- Note the green pop-up that lists how many cases were added to the Subscription.

- If presented with the Account Preferences screen, enter your Name in the box provided.
- Click Add to enter an email address in the box provided, if desired.

- The Email Address Verification page will appear.
- Enter the email address and click Send Verification Code.

- A pop-up will indicate the verification code was sent successfully.

Note: if an email address is already in use, an error message will appear. Use another email address to continue.

- Check your Inbox for the email address you entered; there will be a message from CASS with the needed verification code.
- Enter that code into the Enter verification code box and click Validate.

- A pop-up will appear to indicate the email address was verified and saved successfully.

- Click the drop-down and select the time of day to receive case reminders and any updates.

- Select the number of days prior to the court hearing date to receive the reminder.
- Select email or text (or both) for updates and reminders, then click Save.
Please note that if a cell number or an email address has not been added, that check box will be greyed out.
Note: If the number of cases in the email notification exceeds 100, an email will be sent with a link to review all cases.

- To review the cases to which you are subscribed, click Subscription.

- The Subscription List will appear.
- Check the box to the left of the case(s) that you want to review and click the Details box on the right
side of the page.

- The selected case(s) will appear for review. If you would like to stop receiving updates for a case, click Unsubscribe on the right of page, if desired. Otherwise, click Return to Subscription List.

- If you click Unsubscribe, a pop-up box will appear to confirm you have unsubscribed from a case.

- To add more cases to your Subscription List, click Add Cases.

- The Search Criteria section will appear. Type the desired name in the box provided and click Search.

- The Search Results will appear. Select all cases you wish to add and click Subscribe to add cases.
- If you have already subscribed to a case, a pop-up box will appear to alert you.

- When reviewing case information, to remove a case from your subscription list, click the Unsubscribe button.

-
For more options, click the Person icon
 on the top right of the page and select from the drop-down menu that includes: Account Preferences , Subscription, how to Delete an Account , and Logout.

-
To exit CASS, click Logout in the drop-down.
Note: To contact technical support for the Case Alert Subscription System, please email [email protected]. If you have a question or need assistance regarding a case, contact the Clerk of Court. A list of courts and their associated clerks can be found on the Virginia Judicial System website.
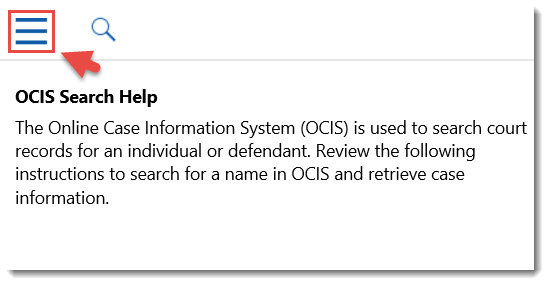
- Tap or click the Main Menu tribar to view the list of available links.

- Tap or click one of the links in the list to navigate to another area or to get more information:
Home: Tap or click to return to the Search Criteria page and start a new search.
Terms & Conditions of Use: Tap or click to read and refer to the Terms & Conditions of Use.
Help: Tap or click to get help using OCIS.
About This System: Tap or click to get more information about OCIS.
Circuit Court OCIS: Tap or click to go to the Circuit Court Online Case Information System.
General District Court OCIS: Tap or click to go to the General District Court Online Case Information System.
Table of Contents and Page Links
- Tap or click the Question Mark icon
 on the top right corner of the page.
 - The OCIS Search Help page will appear. On your device, tap the Menu tribar in the top left corner to view the Table of Contents (on a desktop computer, the expanded Table of Contents will be visible without this step).
- The Table of Contents will appear. Tap or click a link to navigate to the desired page of the OCIS Search Help.
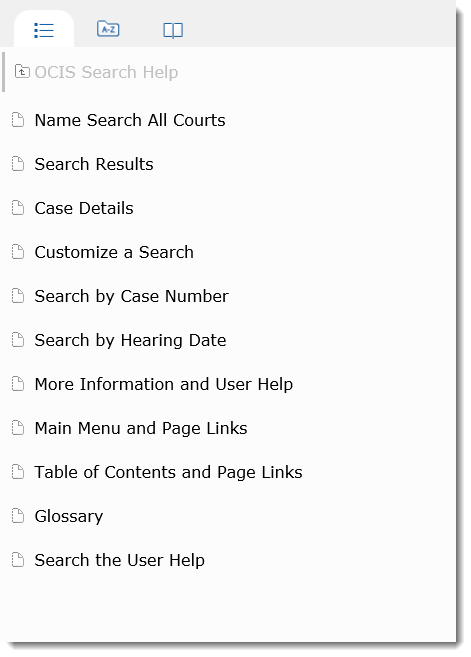
- Tap or click the small file folder icon in the top left corner and the contents will expand to a list with other links to pages that have more information.

- Tap or click one of the links to go to that page and review the information.
Note: you can use the + or - and the small folder icons to the left of each title to expand or reduce topics, as needed.

Glossary
There is a Glossary of terms in OCIS User Help. It may be helpful to define legal terms that appear in the Case Details pages.
- Tap or click the Book icon on the top left corner of the screen. The Glossary of terms will
appear.

- Tap or click a word in the list to read the definition.

- You may also type a word in the Filter Terms box at the top of the page to search for a term and to filter the list for a definition in the Glossary.
Search the User Help
To use the Search Bar to search the User Help contents for specific information, use the following instructions.
- Tap or click the Magnifying Glass icon. The Search Bar will appear.
- Enter a search term and tap the Magnifying Glass icon next to the Search Bar (or hit Enter on your desktop computer).
Note: to help refine your search results, check the box next to Include all words in search.

- Click any of the links below the Search Bar to visit that page and review information.